A file server is a central server in a computer network that provides file systems or at least parts of a file system to connected clients. File servers therefore offer users a central storage place for files on internal data media, which is accessible to all authorized clients. Here, the server administrator defines strict rules regarding which users have which access rights: For instance, the configuration or file authorizations of the respective file system enable the admin to set which files can be seen and opened by a certain user or user group, and whether data can only be viewed or also added, edited, or deleted.
With file servers connected to the internet and configured accordingly, users cannot only access the files via the local network but also benefit from remote access. This enables files to be accessed and saved on the file server even when users are on the go. All modern operating systems such as Windows, Linux, or macOS can be used on a file server, although the devices available in the network need to be compatible with the operating system. But file servers are not only used for file storage and management. They are also often used as a repository for programs that have to be accessible to multiple network participants, and as a backup server.
- Install File Server
- Set Network File Sharing
- Set File Sharing (Advanced)
- Access to Share folder
- Configure SMB Multi Channel
- Install Resource Manager
- Set Quotas
- Set auto apply Quotas
- Install DFS NameSpace
- Create DFS NameSpaces
- Set Folders to DFS NameSpace
- Install DFS Replication
- Configure DFS Replication
Install File Server
Step 1: Run Server Manager and Click Add roles and features and click Next on first page.
Step 2: Select Role-based or feature-based installation.

Step 3: Select a Host which you’d like to add services.

Step 4: Check a box File Server.

Step 5: Click Next button.

Step 6: Click Install button to begin installation.

Step 7: After finishing Installation, click Close button.

Set Network File Sharing
Step 1: Right-Click the Folder you’d like to set Sharing and Open Properties.

Step 2: Move to Sharing Tab and Click Share… button.

Step 3: Select users or groups you allow to access to Sharing. On this example, select Everyone.

Step 4: Select Access permission for the users or groups you set. On this example, select Read/Write.

Step 5: This is the setting of Network discovery and file sharing. Select the one for your requirements. On this example, select No, *****.

Step 6: Sharing has been configured.

Step 7: To configure with Share… button, NTFS access permission is also configured automatically.
(on this example, Everyone: Full Control has been set)

Set Network File Sharing(Advance)
Step 1: Add Users or Groups you allow to access to Sharing. On this example, Add DevGroup01 for Sharing like follows.

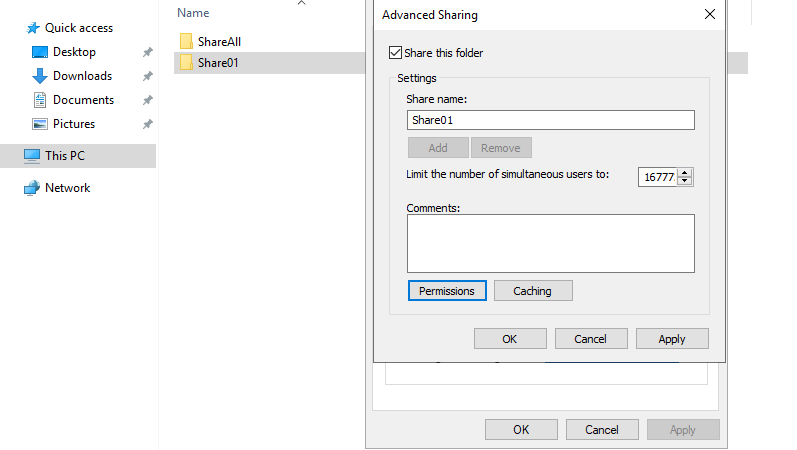
Step 2: Right-Click the Folder you’d like to set Sharing and Open Properties. Next, move to Sharing tab and Click Advanced Sharing button.

Step 3: Check a box Share this folder and input any Share name you like on Share name field. Next, Click Permissions button.

Step 4: Add Users or Groups you’d like to allow to access to Share. By default, Everyone:Read is granted, Remove it with Remove button, and next, Click Add button to add necessary permissions.

Step 5: Input user or group you’d like to add permissions.

Step 6: Set permissions for user or group just added.

Step 7: Click OK to finish sharing settings.
Step 8: Back to the Properties window, then Click Security tab to move to add NTFS access permissions, too.

Step 9: Set NTFS permissions, Click Advanced button.

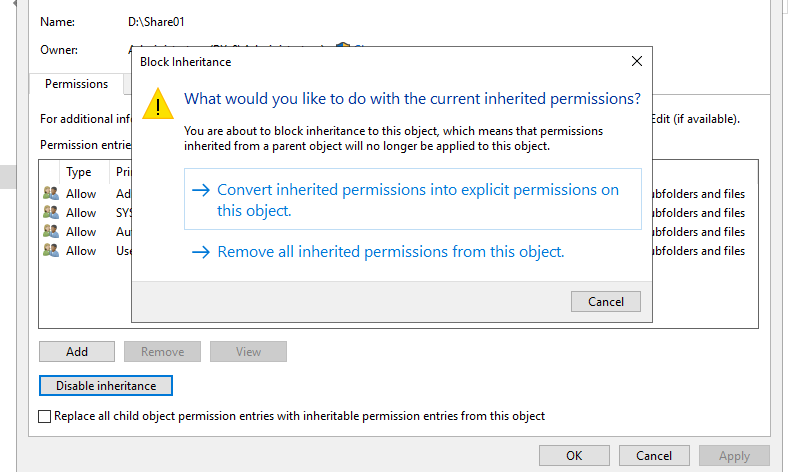
Step 10: Remove unnecessary permissions like Users and so on. But generally inheritance is enabled, so disable it first to remove unnecessary permissions. Click Disable inheritance button.

Step 11: Select the way for removing inheritance. On this example, select Convert ***.
Step 12: Click Remove button to remove unnecessary permissions like Users first, next, Click Add button to add necessary permissions.
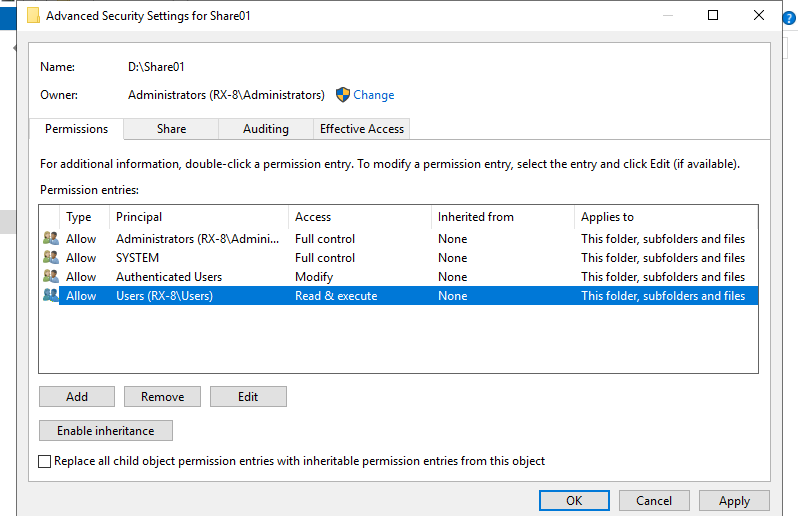
Step 13: This is the window for setting permissions. Click Select a principal link.

Step 14: Input user or group you’d like to add permissions.

Step 15: Check boxes you’d like to set permissions.

Step 16: After setting necessary permissions, Click [OK] to finish settings. That’s OK all.

Access to Share folder
Step 1: This is for the case of Assigning drive letter and access to Share Folder. Open Explorer and right-click Network on the left pane, then select Map network drive.

Step 2: User authentication form is shown and you need to authenticate with a user that is set to allow to access to Share on Server. But on specific cases like follows, User authentication form is not shown because authentication is passed on background.
The specific cases without user authentication form is like follows.
* File Server and Client Host are in the same Active Directory Domain and also a user logon on Clist Host is allowed to access to Share Folder on Server setting.
* Even on WorkGroup environment, a user exists on Client Host that name is the same with the user that is allowed to access to Share Folder on Server settings and also their password is the same.

Step 3: Just accessed to Share folder. Try to read or write files or folders to verify settings.

Step 4: This is for the case of accessing to Share Folder without assigning drive letter.
Run Start -> Run and then, input Share path like \\(Server name)\(Share name).

Step 5: Authenticate with a user that is allowed to access to Share folder. (but on specific cases as writing in step 3, this form is not shown)

Step 6: Just accessed to Share folder.
Configure SMB Multi Channel
To configure SMB Multi Channel feature that is implemented in SMB 3.0, it’s possible to use multiple network interfaces for file service.
To use SMB Multi Channel feature, it must satisfy at least one of the following conditions.
* Network adopters support RSS (Receive Side Scaling)
* Network adopters are grouped with NIC Teaming
* Network adopters support RDMA (Remote Direct Memory Access)
Step 1: Run PowerShell with Admin Privilege and Configure.

Step 2: Verify file transfer speed to access to the target file service from any client computer.
Install Resource Manager
File Server Resource Manager (FSRM) is a role service in Windows Server that enables you to manage and classify data stored on file servers. You can use File Server Resource Manager to automatically classify files, perform tasks based on these classifications, set quotas on folders, and create reports monitoring storage usage.
File Server Resource Manager includes the following features:
Quota management allows you to limit the space that is allowed for a volume or folder, and they can be automatically applied to new folders that are created on a volume. You can also define quota templates that can be applied to new volumes or folders.
File Classification Infrastructure provides insight into your data by automating classification processes so that you can manage your data more effectively. You can classify files and apply policies based on this classification. Example policies include dynamic access control for restricting access to files, file encryption, and file expiration. Files can be classified automatically by using file classification rules or manually by modifying the properties of a selected file or folder.
File Management Tasks enables you to apply a conditional policy or action to files based on their classification. The conditions of a file management task include the file location, the classification properties, the date the file was created, the last modified date of the file, or the last time the file was accessed. The actions that a file management task can take include the ability to expire files, encrypt files, or run a custom command.
File screening management helps you control the types of files that user can store on a file server. You can limit the extension that can be stored on your shared files. For example, you can create a file screen that does not allow files with an MP3 extension to be stored in personal shared folders on a file server.
Storage reports help you identify trends in disk usage and how your data is classified. You can also monitor a selected group of users for attempts to save unauthorized files.
For installing Recourse Manager, Select File Server Resource Manager on Select server roles section like follows.

Set Quotas
Step 1: Run Start -> Server Manager -> Tools -> File Server Resource Manager.

Step 2: Select Quotas on the left pane and right-click it, then Open Create Quota.

Step 3: Input the Share Path you’d like to set Quota in Quota path field. And Check a box Create quota on path.
([Auto apply template ****] option is for the auto applied Quota setting, refer to the next page if you’d like to set it)
For Quota properties, Select a templates or set yourself. (on this example, select a template to proceed)

Step 4: Confirm selections and if that’s OK, Click Create button.

Step 5: Quota entry has just been added.
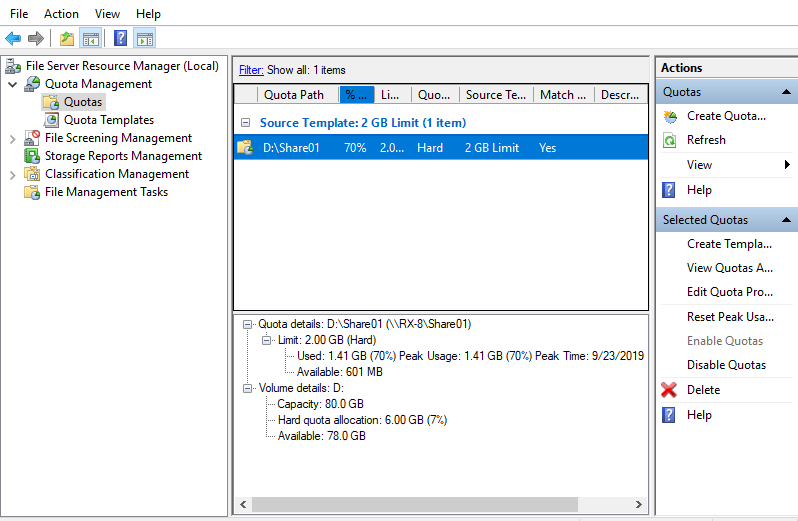
Step 6: Verify Quota setting is valid on the Share folder you set Quota. If you try to save files over capacity limit of Quota, an error is shown and you can not save a file like follows.

Set auto apply Quotas
Step 1: Run Start -> Server Manager -> Tools -> File Server Resource Manager.

Step 2: Select Quotas on the left pane and right-click it, then Open Create Quota.

Step 3: Input the Share Path you’d like to set auto apply Quota in Quota path field.
And Check a box Auto apply template and create quotas on existing and new subfolders.
For Quota properties, Select a templates you’d like to set.

Step 4: Confirm selections and if that’s OK, Click Create button.

Step 5: Auto apply Quota entry has just been added.

Step 6: For auto apply Quota setting, each subfolder under the folder you set auto apply Quota are shown on the Quota entries like follows.

Install DFS NameSpace
Step: Refer to here for installation procedure.
Only a different point, select the DFS Namespaces on feature section like follows.

Create DFS NameSpaces
Step 1: Run Start -> Server Manager -> Tools -> DFS Management.

Step 2: Right click the Namespaces on the left pane and open the New Namespaces on the menu.

Step 3: Set server’s hostname you’d like to set DFS Namespaces and click Next button.

Step 4: Set share name for DFS Namespaces.

Step 5: Select Domain-based or Standalone type. It selects Domain-based on this example. For Enable Windows 2008 mode, if you don’t have specific requirements, generally Check the box to enable it.

Step 6: Click Create button.

Step 7: After successfully creation, Click Close button.
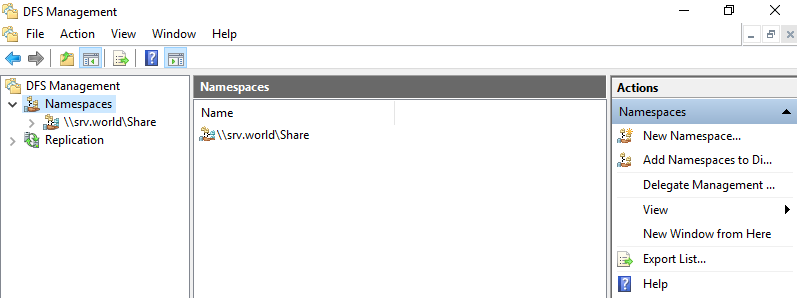
Created Namespaces are listed under the Namespaces section.
Set Folders to DFS NameSpace
Step 1: Run Start -> Server Manager -> Tools -> DFS Management and Right-click the created Namespace to open the New Folder on the menu.

Step 2: Input any folder name on Name field, and input shared folder on Folder targets section.

Step 3: After settings shared folders, they are listed. Next, verify to access to the DFS Namespace root from any client computers which are in the same AD domain.

Install DFS Replication
Step: Refer to here for installation procedure.
Only a different point, select the DFS Replication on feature section like follows.

Configure DFS Replication
Step 1: Run Start -> Server Manager -> Tools -> DFS Management.

Step 2: Right click the Replication on the left pane and open the New Replication Group on the menu.

Step 3: For simply 2 server’s replication group, check a box Replication group for data collection.
If you’d like to use more than 3 servers or use advansed configuration options even if 2s servers, choose Multipurpose replication group.
(proceed with Replication group for data collection on this example)

Step 4: Input any replication group name and description and click Next button.

Step 5: Specify the branch (source) server for replication and click Next button.

Step 6: Specify the replicated folders on the branch server, click Add button.

Step 7: Select the path of replicated folders and click OK.

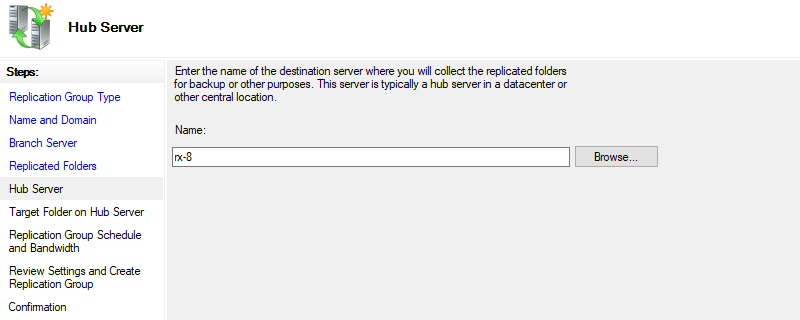
Step 8: Specify the hub (destination) server for replication and click Next button.
Step 9: Specify the target folders on the hub server for replication.

Step 10: Specify the replication schedule and bandwidth. By default settings, replication task is always enabled, data are replicated at once if changes are detected in the target folders and also full bandwidth is used. If you’d like to set specified schedules or limit bandwidth configure them with the lower option.

Step 11: Confirm selections and click Create button if that’s OK.

Step 12: That’s OK if all tasks are Success], click Close button to finish.

Step 13: Created replication groups are displayed on the DFS management.
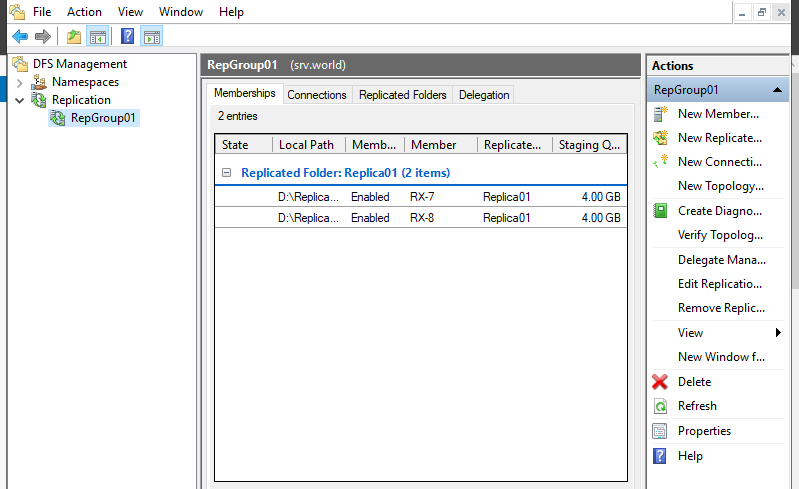
Step 14: Verify settings to put files or folders on the target replication folders.