Microsoft SQL Server is a relational database management system developed by Microsoft. As a database server, it is a software product with the primary function of storing and retrieving data as requested by other software applications—which may run either on the same computer or on another computer across a network (including the Internet). Microsoft markets at least a dozen different editions of Microsoft SQL Server, aimed at different audiences and for workloads ranging from small single-machine applications to large Internet-facing applications with many concurrent users.
Now, for the first time ever, SQL Server 2019 creates a unified data platform with Apache SparkTM and Hadoop Distributed File System (HDFS) packaged together with SQL Server as a single, integrated solution. Through the ability to create big data clusters, SQL Server 2019 delivers an incredible expansion of database management capabilities, further redefining SQL Server beyond a traditional relational database. And as with every release, SQL Server 2019 continues to push the boundaries of security, availability, and performance for every workload with Intelligent Query Processing, data compliance tools and support for persistent memory. With SQL Server 2019, you can take on any data project, from traditional SQL Server workloads like OLTP, Data Warehousing and BI, to AI and advanced analytics over big data.
SQL Server provides a true hybrid platform, with a consistent SQL Server surface area from your data center to public cloud—making it easy to run in the location of your choice. Because SQL Server 2019 big data clusters are deployed as containers on Kubernetes with a built-in management service, customers can get a consistent management and deployment experience on a variety of supported platforms on-premises and in the cloud: OpenShift or Kubernetes on premises, Azure Kubernetes Service (AKS), Azure Stack (on AKS) and OpenShift on Azure. With Azure Hybrid Benefit license portability, you can choose to run SQL Server workloads on-premises or in Azure, at a fraction of the cost of any other cloud provider.
[SQL Server Management Studio (SSMS) is an integrated environment for managing any SQL infrastructure. Use SSMS to access, configure, manage, administer, and develop all components of SQL Server, Azure SQL Database, and Azure Synapse Analytics.]
- Install SQL 2019
- Connect to Database Engine
- Connect from Remote Hosts
- SQL Server Services
- SQL Server System Databases
- Firewall Settings for SQL Server
- AlwaysOn Availability Groups #1
- AlwaysOn Availability Groups #2
Install SQL 2019
Install SQL Server 2019 with stand-alone installation.
Download SQL Server 2019 from here.
Step 1: Navigate to the directory/folder where you downloaded the application then double-click it to start the installation process.
Step 2: After you have chosen the custom installation, click on “Install”. Allow the application to download and install packages.
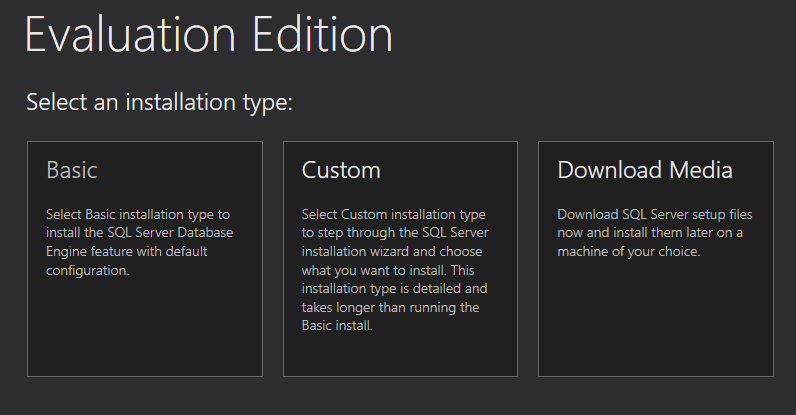
You have the “Basic“, “Custom” and “Download Medium” installation types. I recommend you choose “Custom” to tweak your installation of SQL Server 2019 Developer Edition on Windows Server 2019.
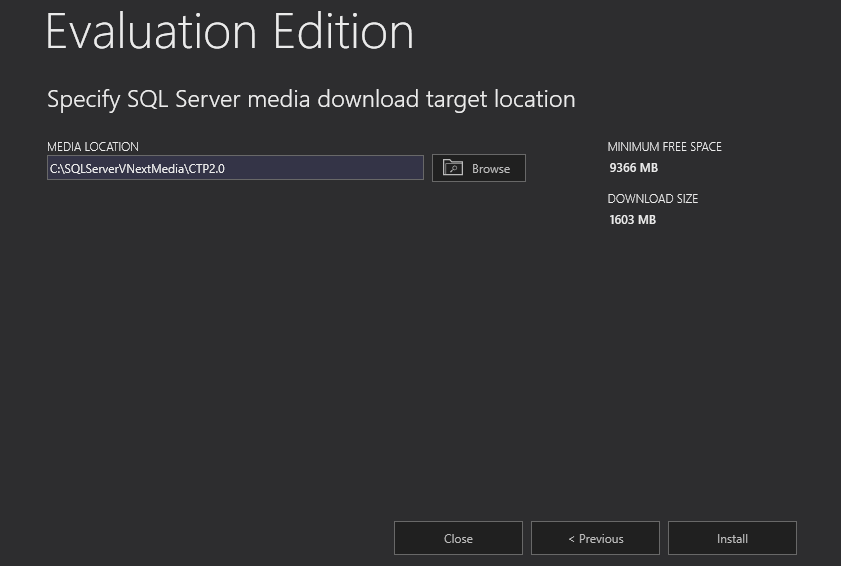
Step 3: Specify a directory where SQL Server will store files downloaded for installation and click on Install to move further. It downloads the media and starts the installation.
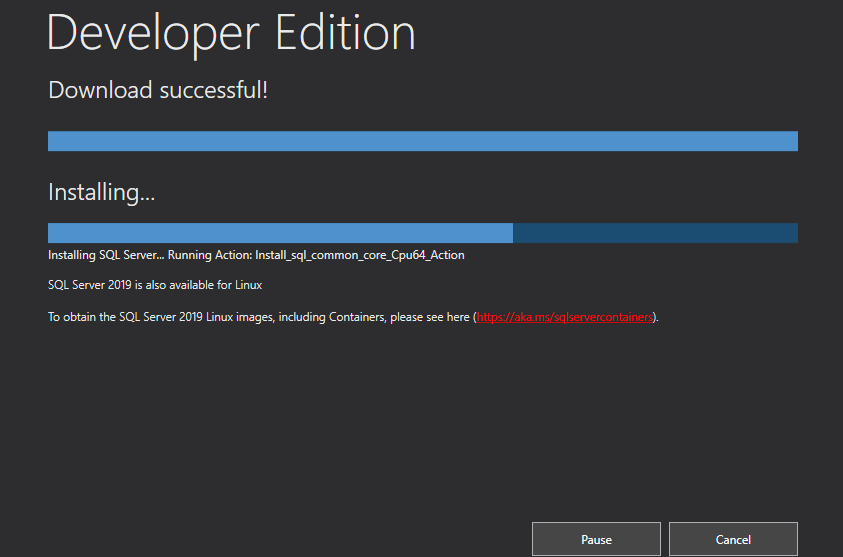
Step 4: Be patient as the download begins, it may take some time. Once downloading is completed it will start installing automatically.
You may asked to install SSMS which you can install and may need to restart PC.
Step 5: After all of the packages have downloaded, a new page as illustrated below will follow. Click on “Installation” and and click New SQL Server stand-alone installation *** on the top of right pane.

Step 6: Select an Edition of SQL Server you’d like to install and click Next.

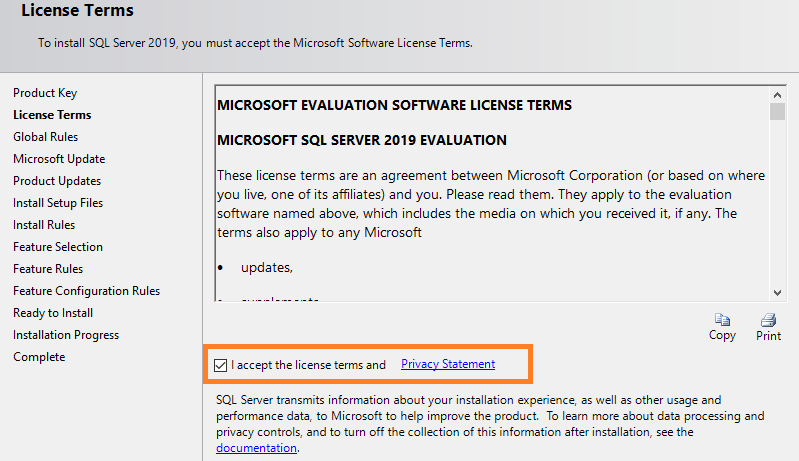
Step 7: Read License terms well and check a box I accept the license terms to agree with it and click Next.
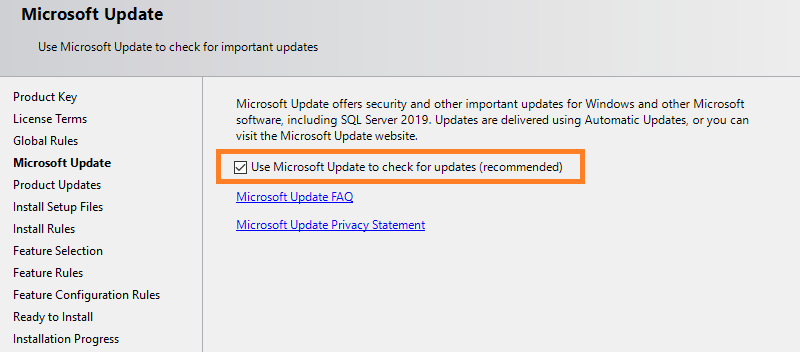
Step 8: Select to check important update or not and click Next.
Step 9: Setup rules identify potential problem’s. Check the result and improve if problems are detected. For the warning of Windows firewall, it’s possible to configure later for SQL Server, so it’s OK to proceed.

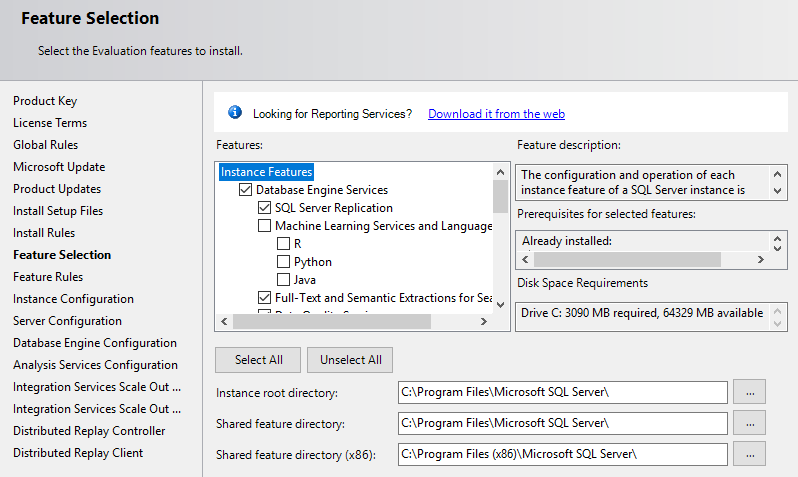
Step 10: This is the section of selecting features you’d like to install.
On this example, it selects mostly all features except Machine Learning and PolyBase Query Service for External Data. For Machine Learning and PolyBase Query Service for External Data, those are installed with Python, Java, Microsoft R for dependency.
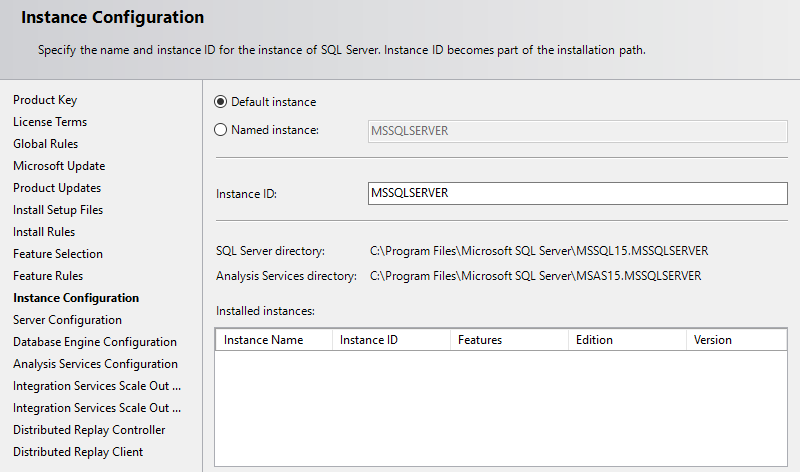
Step 11: This is the section of Instance Configuration. Select Default Instance or Named Instance and click Next. (Keep default on this example)
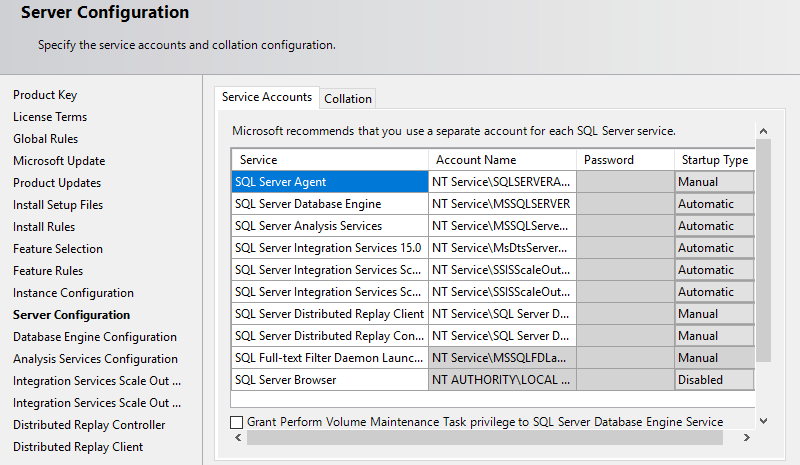
Step 12: This is the section of Service Accounts Configuration. Change them for your requirements and click Next. (Keep default on this example)
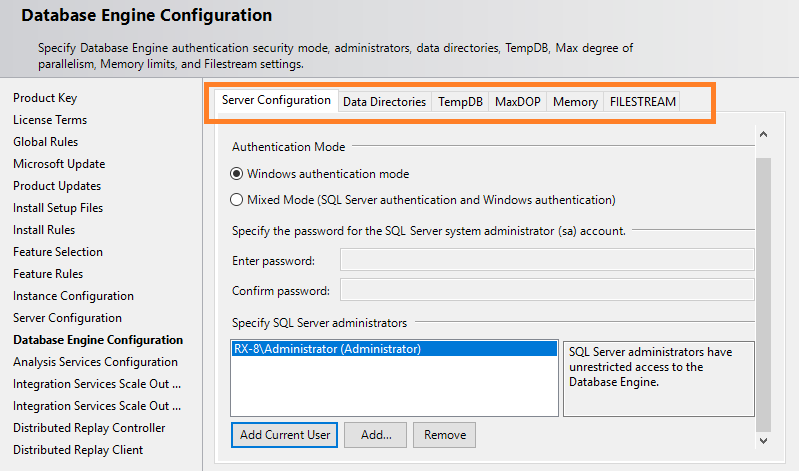
Step 13: This is the section of Database Configuration. Select Authentication Mode and specify SQL Server administration account. If that’s OK, move to Data Directories tab.
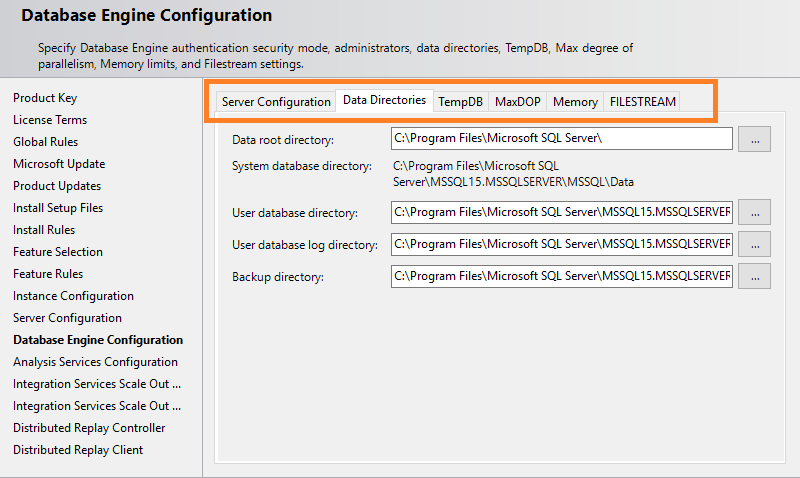
Step 14: This is the section of Data Directories Settings. Change them for your requirements. (Keep default on this example) If that’s OK all, move to TempDB tab.
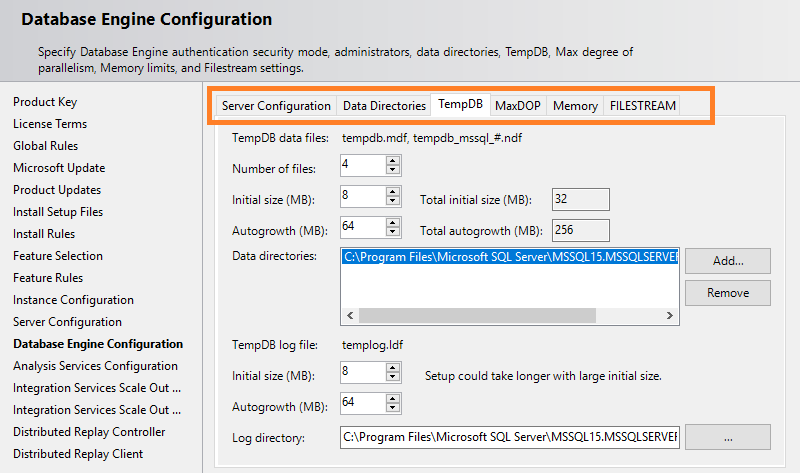
Step 15: This is the section of TempDB Settings. Change them for your requirements. (Keep default on this example) If that’s OK all, move to MaxDOP tab.
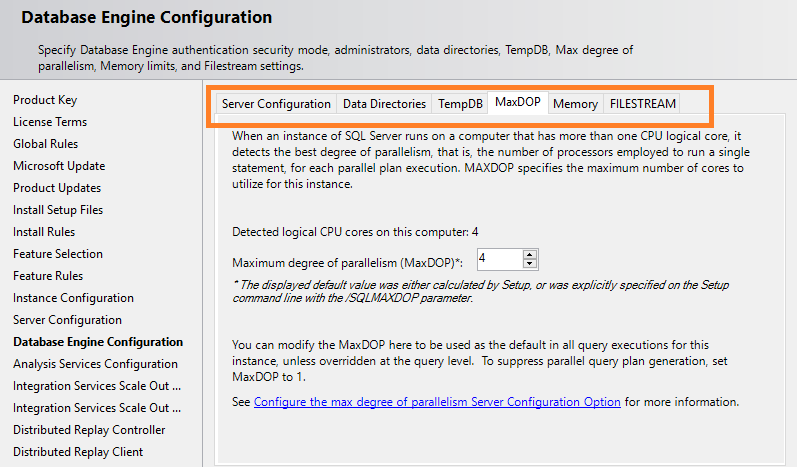
Step 16: This is the section of MaxDOP Settings. Change them for your requirements. (Keep default on this example) If that’s OK all, move to Memory tab.
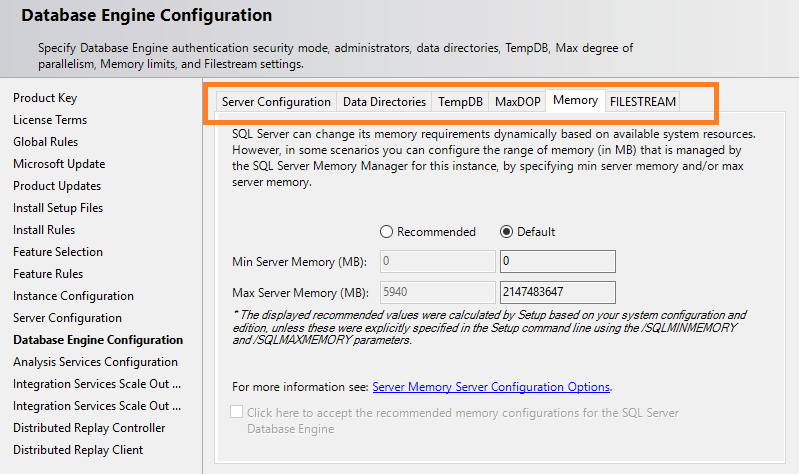
Step 17: This is the section of Memory Settings. Change them for your requirements. (Keep default on this example) If that’s OK all, move to FILESTREAM tab.
Step 18: This is the section of FILESTREAM Settings. Change them for your requirements. (Keep default on this example) If that’s OK all, Proceed to next.

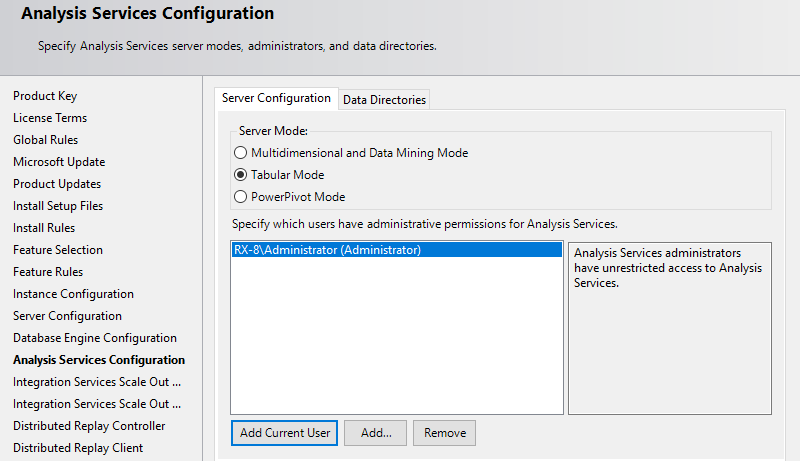
Step 19: This is the section of Analysis Services Configurations. Specify Administration Account of Analysis Services.
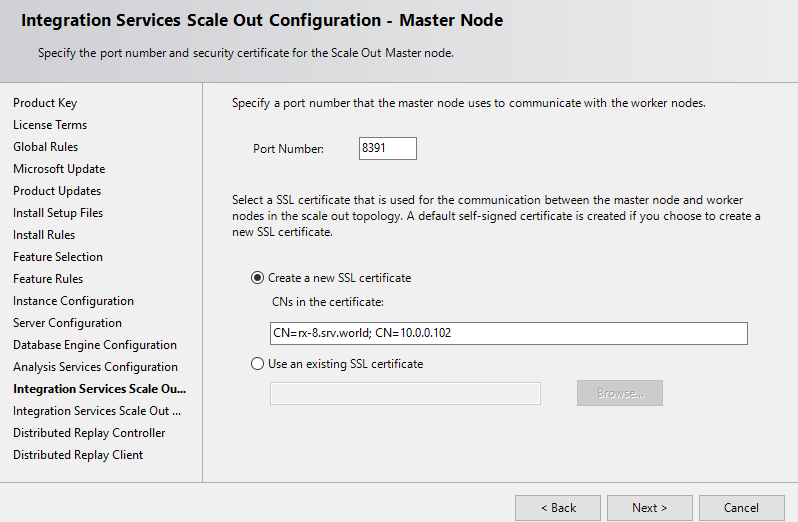
Step 20: This is the section of Integration Services Scale out (Master Node) Configurations. Change them for your requirements. (Keep default on this example) If that’s OK all, Proceed to next.
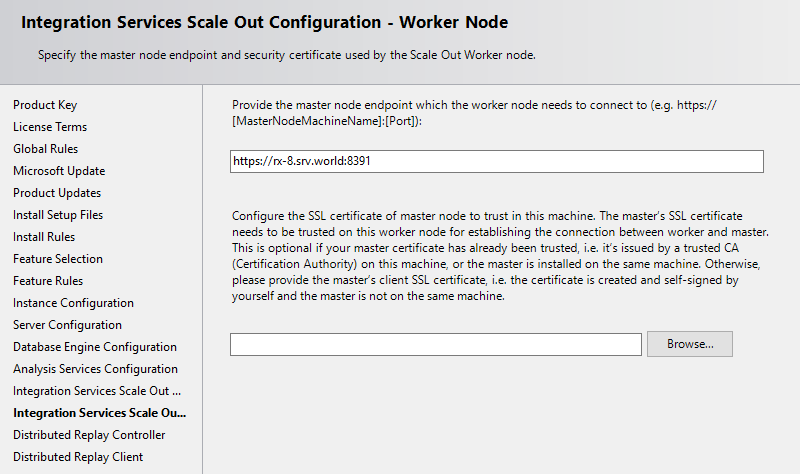
Step 21: This is the section of Integration Services Scale out (Worker Node) Configurations. Change them for your requirements. (Keep default on this example) If that’s OK all, Proceed to next.
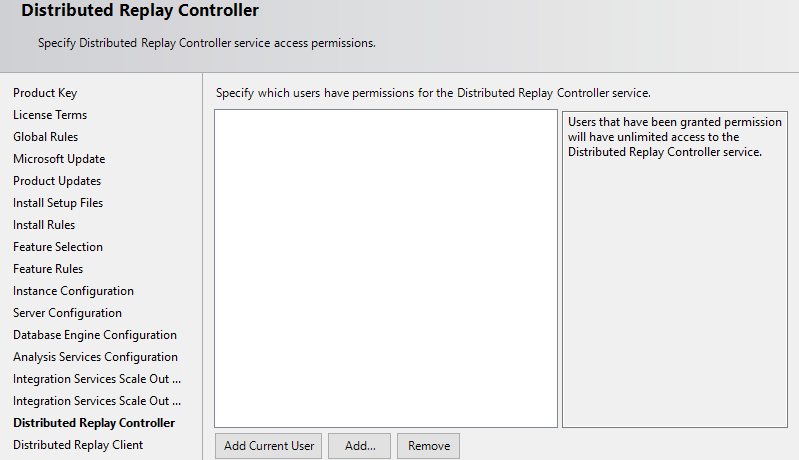
Step 22: This is the section of Distributed Relay Controller Configurations. Change them for your requirements. (Keep default on this example) If that’s OK all, Proceed to next.
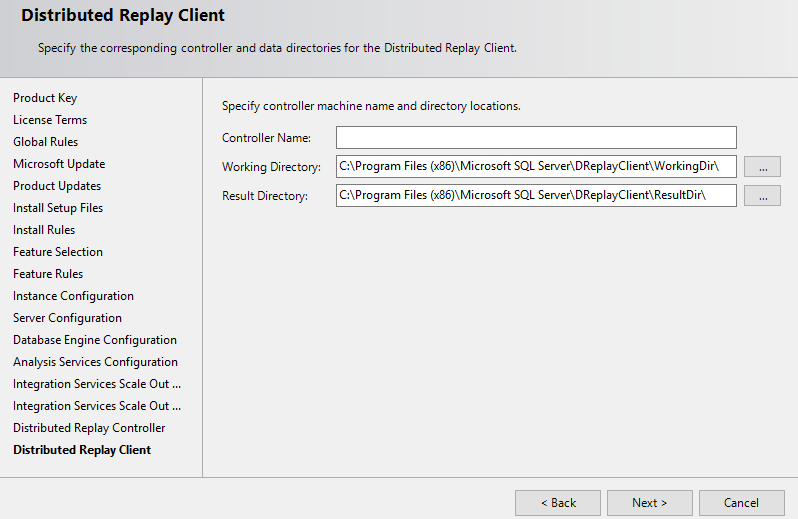
Step 23: This is the section of Distributed Relay Client Configurations. Change them for your requirements. (Keep default on this example) If that’s OK all, Proceed to next.
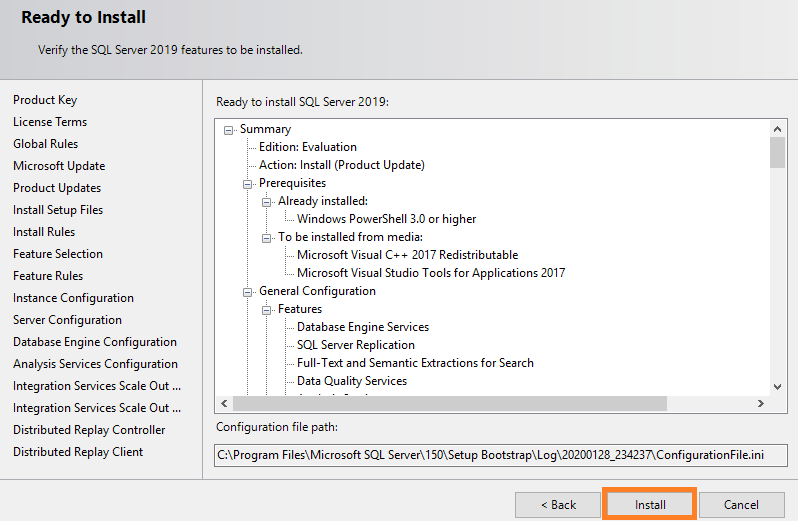
Step 24: Verify selection of features and it it’s OK, Click Install button.
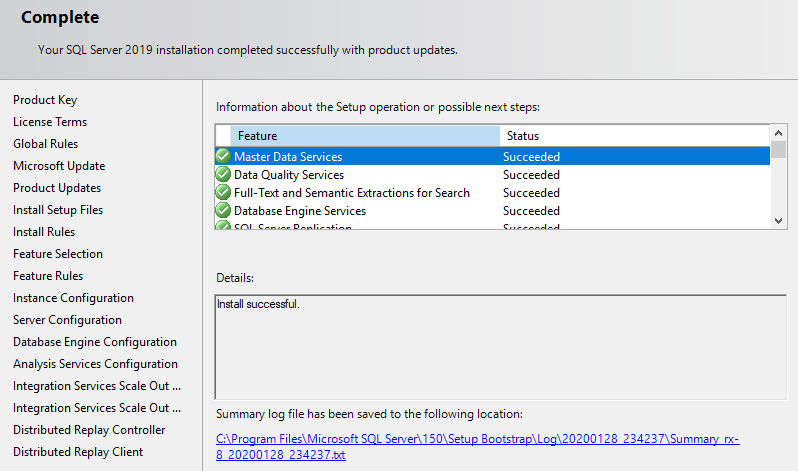
Step 25: Installation Starts. After finishing Installation, Click Close button to complete.
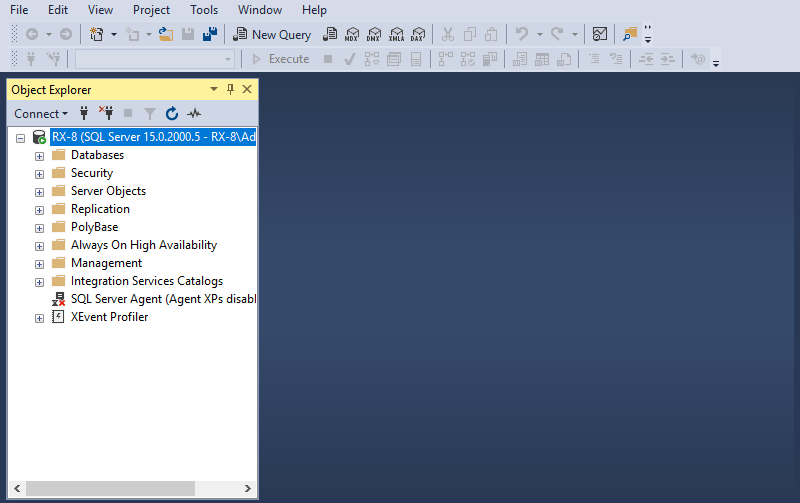
Connect to Database Engine
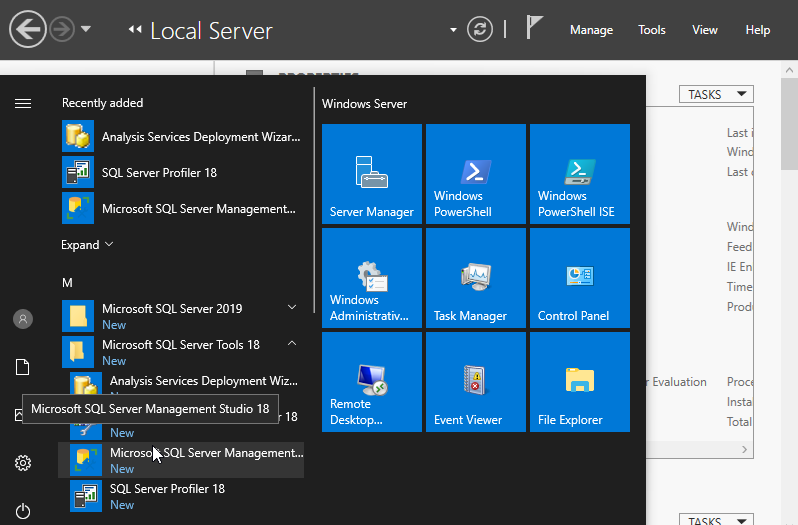
Step 1: If you’d like to connect on localhost with GUI operation, it needs to install SQL Server Management Studio (SSMS).
Download and Install SSMS from the official site below.
⇒ https://docs.microsoft.com/en-us/sql/ssms/download-sql-server-management-studio-ssms?redirectedfrom=MSDN&view=sql-server-ver15
After installing SSMS, run it.
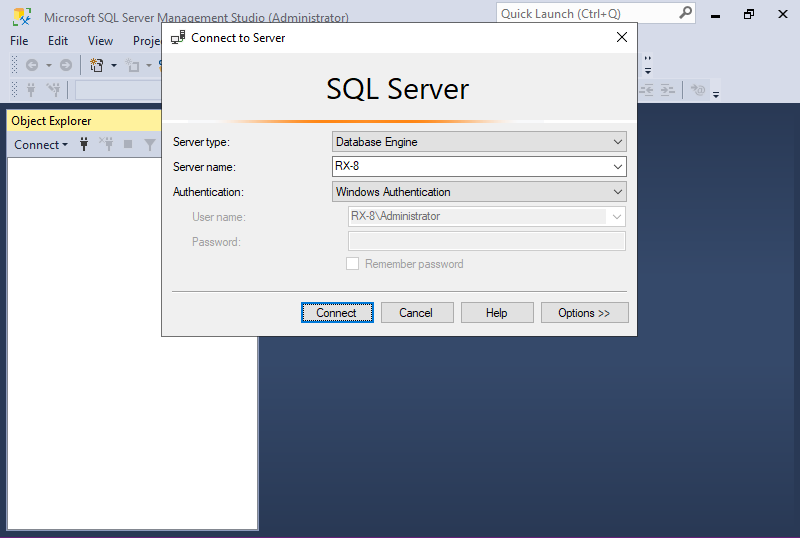
Step 2: Click Connect button. It’s OK to keep default for all selection if localhost connection.
Step 3: Just connected. It’s possible to manage and configure SQL Server on here.
Connect from Remote Hosts
Step 1: On GUI change operation, first Install and use SSMS on SQL Server Host. and if Windows Firewall is running, allow [1433/TCP].
Change authentication mode. Run SSMS and connect to database, then right-click the instance name and open Properties.
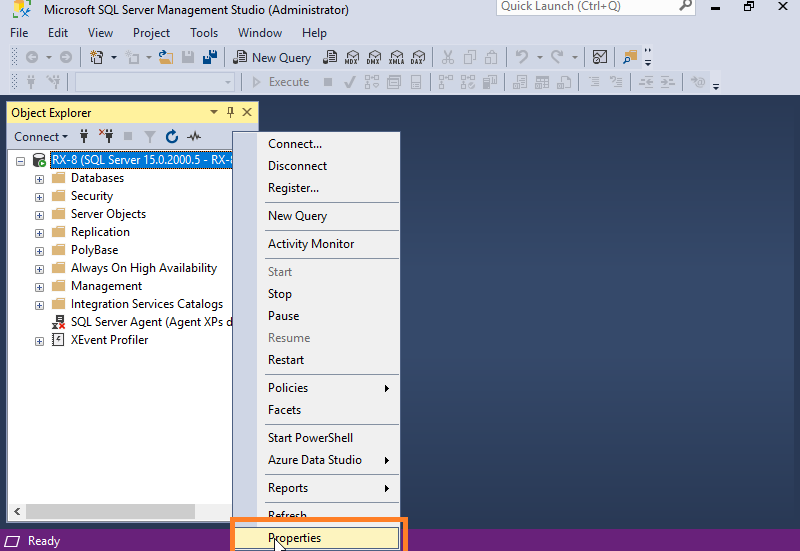
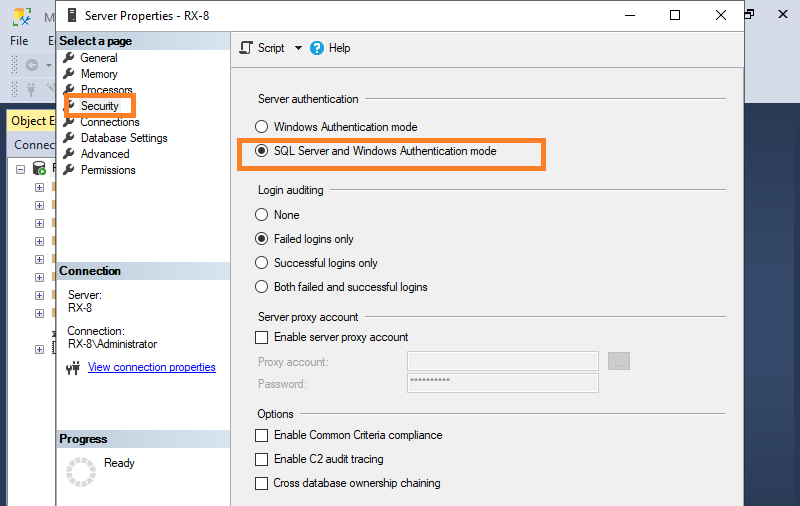
Step 2: Select Security on the left pane and check a box SQL Server and Windows Authentication mode on the right pane.
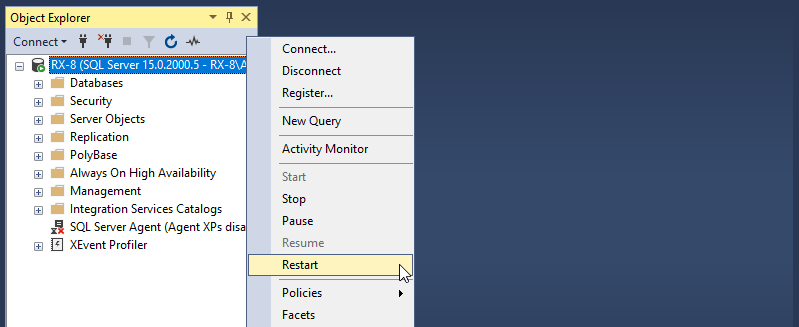
Step 3: Right-click instance name and run Restart.
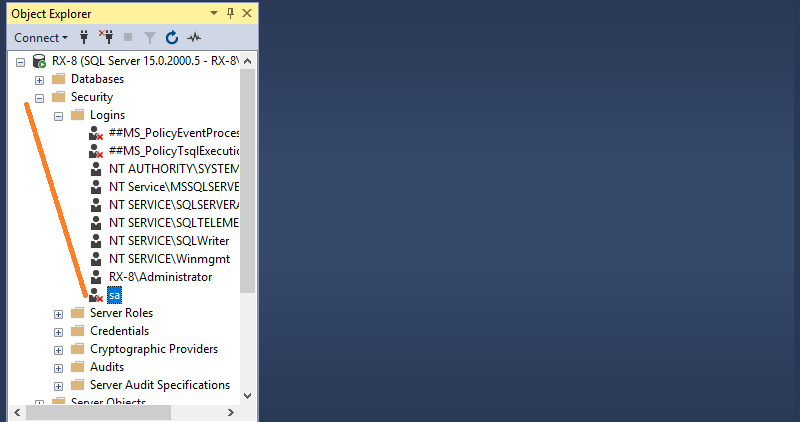
Step 4: Next, enable SQL Server admin user.
Open Security -> Logins on the left pane and right-click sa to open Properties.
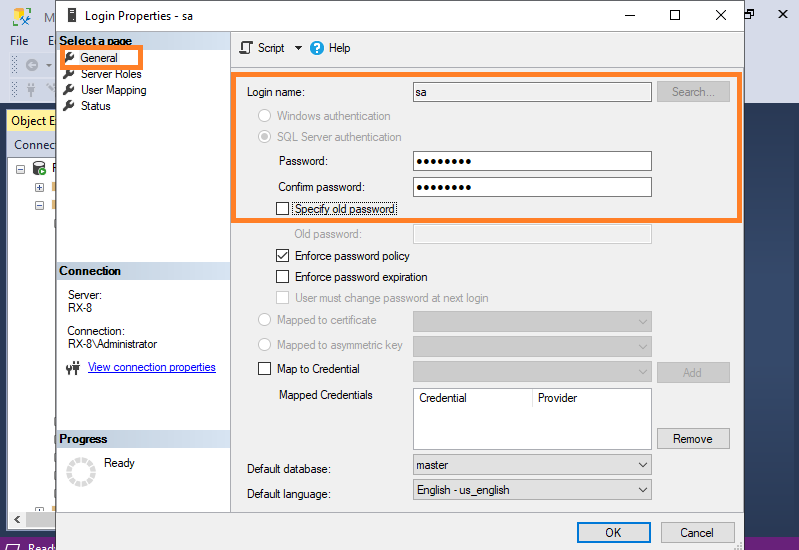
Step 5: Select General on the left pane and set SQL Server admin password.
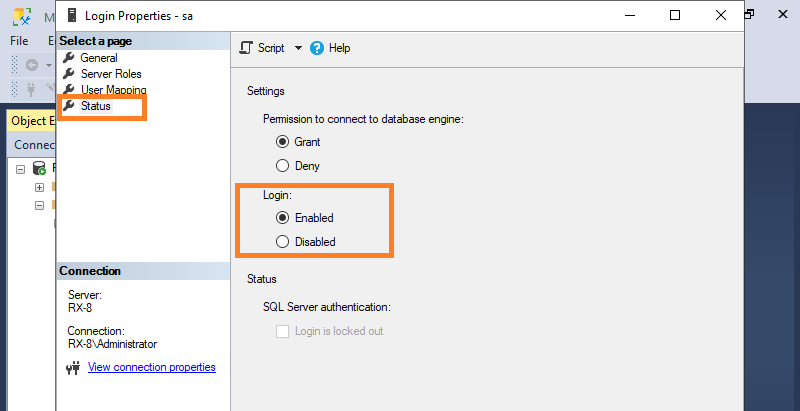
Step 6: Select Status on the left pane and enable Login.
Step 7: For remote Host on Windows 10 setting, Download and Install SQL Server Management Studio (SSMS).
⇒ https://docs.microsoft.com/en-us/sql/ssms/download-sql-server-management-studio-ssms?redirectedfrom=MSDN&view=sql-server-ver15
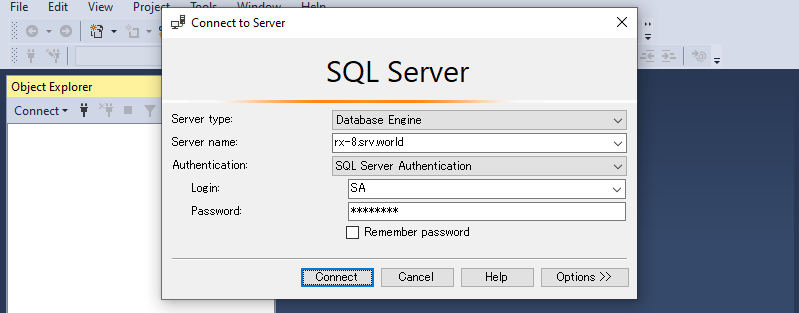
After installing SSMS, run it and select SQL Server Authentication and also specify SA for login user to login with remote connection.
Step 8: You are just logged in from remote host.
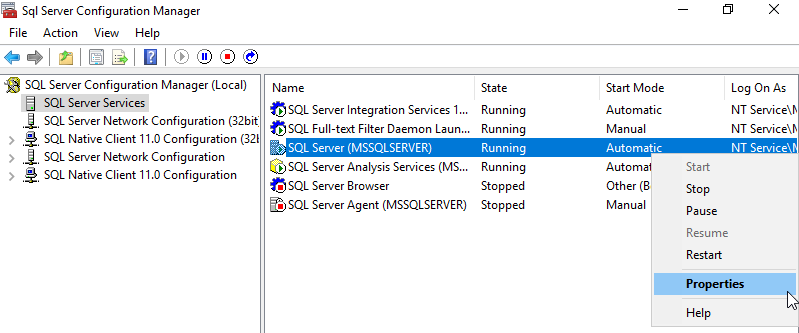
SQL Server Services
SQL Server related Services are like follows. (Instance name or Account name are all default one)
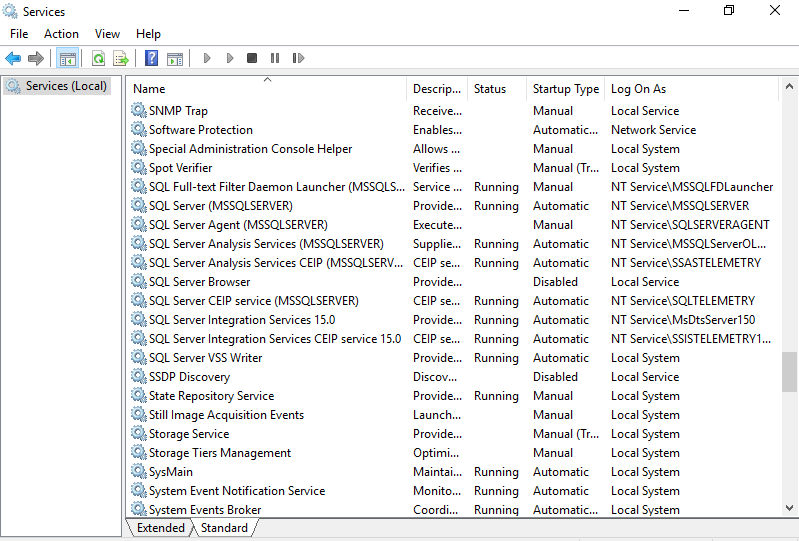
| Service Name | Service Account (Default) | Description |
|---|---|---|
| SQL Full-text Filter Daemon Launcher | FTPNT Service\MSSQLFDLauncher | Provides Full-text search |
| SQL Server | NT Service\MSSQLSERVER | SQL Server Relational Database Engine Service |
| SQL Server Analysis Services | NT Service\MSSQLServerOLAPService | Supplies online analytical processing (OLAP) for business intelligence applications |
| SQL Server Analysis Services CEIP | NT Service\SSASTELEMETRY | CEIP (Customer Experience Improvement Program) for Analysis Services |
| SQL Server Browser | NT AUTHORITY\LocalService | Provides SQL Server connection information to client computers |
| SQL Server CEIP service | NT Service\SQLTELEMETRY | CEIP for Database Engine Service |
| SQL Server Distributed Replay Client | NT Service\SQL Server Distributed Replay Client | Provides Distributed Replay Client feature |
| SQL Server Distributed Replay Controller | NT Service\SQL Server Distributed Replay Controller | Provides Distributed Replay Controller feature |
| SQL Server Integration Services 15.0 | NT Service\MsDtsServer150 | Provides management support Integration Services package storage and execution |
| SQL Server Integration Services CEIP | NT Service\SSISTELEMETRY150 | CEIP for Integration Services |
| SQL Server Integration Services Scale Out Master 15.0 | NT Service\SSISScaleOutMaster150 | Manage Scale Out System by SSIS DB catalog |
| SQL Server Integration Services Scale Out Worker 15.0 | NT Service\SSISScaleOutWorker150 | Execute local package to pull tasks from Scale Out Master |
| SQL Server VSS Writer | NT AUTHORITY\System | Provides the interface to backup and restore SQL Server through the Windows VSS |
| SQL Server Agent | NT Service\SQLSERVERAGENT | Execute jobs, monito |
SQL Server System Databases
There are two type of Databases on SQL Server, one is System Database, other is User Database.
User Databases are the common one users can use.
System Databases are created automatically by System and there are 5 System Databases like follows. (one is Hidden database)
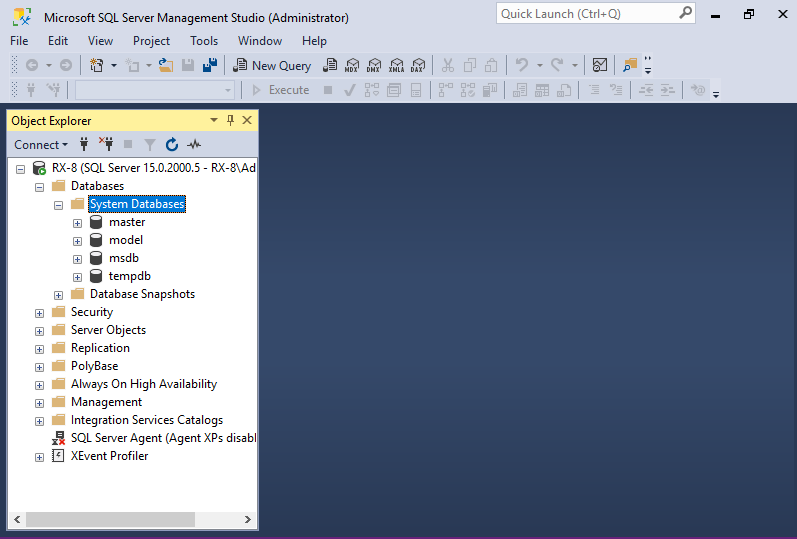
| System Database | Description |
|---|---|
| master | Records all the system-level information for a SQL Server system |
| msdb | Used by SQL Server Agent for scheduling alerts and jobs and by other features |
| model | Used as the template for all databases created on an instance of SQL Server |
| tempdb | Global resource that is available to all users connected to the instance of SQL Server or connected to SQL Database |
| resource | Read-only database that contains all the system objects that are included with SQL Server |
Firewall Settings for SQL Server
It needs to configure Firewall if it is running and also if you’d like to connect to SQL Server from remote Hosts.
| Service | Protocol | Port | Description |
|---|---|---|---|
| Default Instance | TCP | 1433 | Default Port for Default Instance |
| Default Instance (only for Admin) | TCP | 1434 | Admin Port for Default Instance |
| SQL Server Browser Service | UDP | 1434 | Used by SQL Server Browser if Named Instance is used |
| HTTP Connection | TCP | 80 | HTTP Connection Port (Database Engine, Analysis Services, Reporting Services) |
| HTTPS Connection | TCP | 443 | HTTPS Connection Port (Database Engine, Analysis Services, Reporting Services) |
| Service Broker | TCP | 4022 | Not the default port but used in Books Online examples |
| Database Mirroring | TCP | 7022 | Not the default port but used for Database Mirroring by Default Instance |
| Transact-SQL Debugger | TCP | 135 | Transact-SQL Debug Port |
| Analysis Services | TCP | 2383 | Default Port used by Default Instance |
| SQL Server Browser Service | TCP | 2382 | Used by Named Instance for Analysis Services |
| Integration Services | TCP | 135 | Integration Services use DCOM on Port 135 |
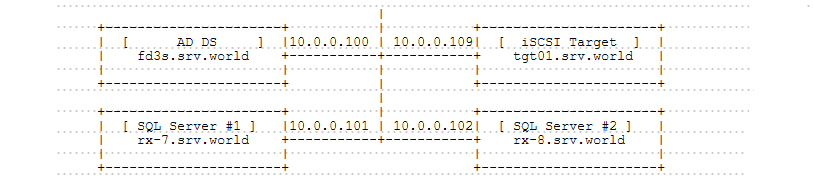
AlwaysOn Availability Groups #1
Configure AlwaysOn Availability Groups.
This example is based on the environment with 2 SQL Servers like follows. (possible to configure with more than 3 SQL Servers)
Step 1: Configure Windows Server Failover Clustering (WSFC) on all Nodes you plan to configure AlwaysOn Availability Groups, refer to here. .
Step 2: Create a domain user account on AD DS for SQL Server, refer to here.
Step 3: Install SQL Server with standalone mode on all Nodes you plan to configure AlwaysOn Availability Groups.
Step 4: Change settings like following all sections on all Nodes you plan to configure AlwaysOn Availability Groups.
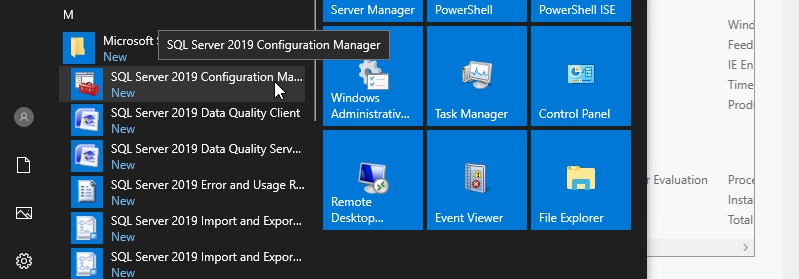
Run SQL Server 2019 Configuration manager.
Step 5: Select SQL Server Services on the left pane and right click SQL Server (***) on the right pane to open Properties. .
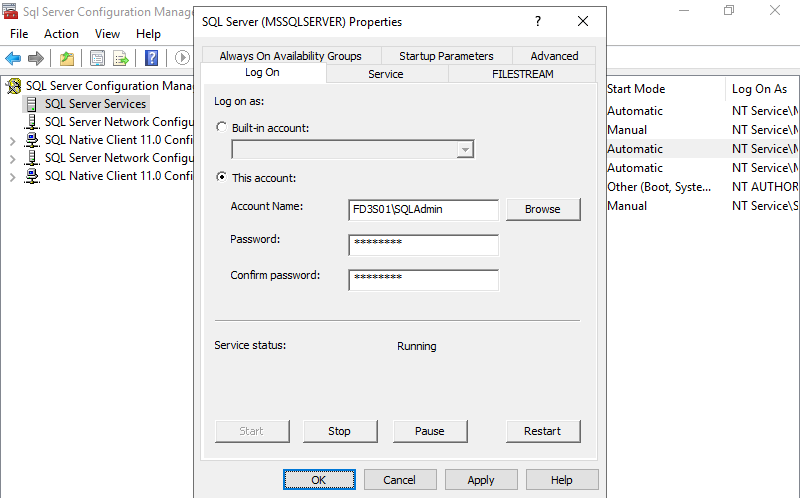
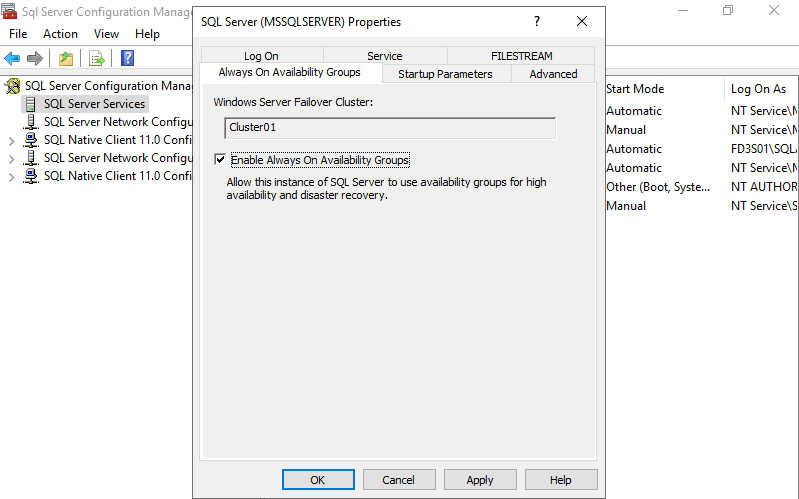
Step 6: Change logon user to the AD user you created on step 2. Next, move to the Alwayson Availability Groups tab.
Step 7: Check a box Alwayson Availability Groups and apply settings. After changing, restart SQL Server service.
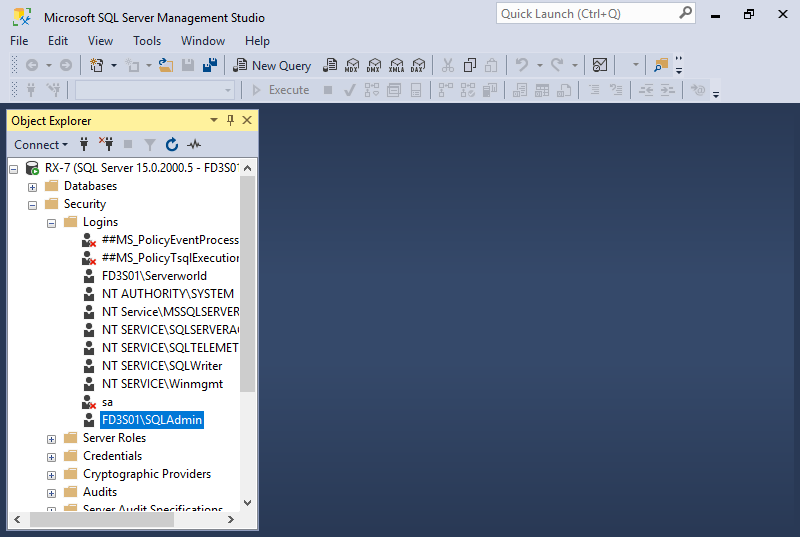
Step 8: Add the AD user account you created on step 2 to the SQL Server login. Run SQL Server Management Studio (SSMS) and add the user on Security -> Logins like follows.
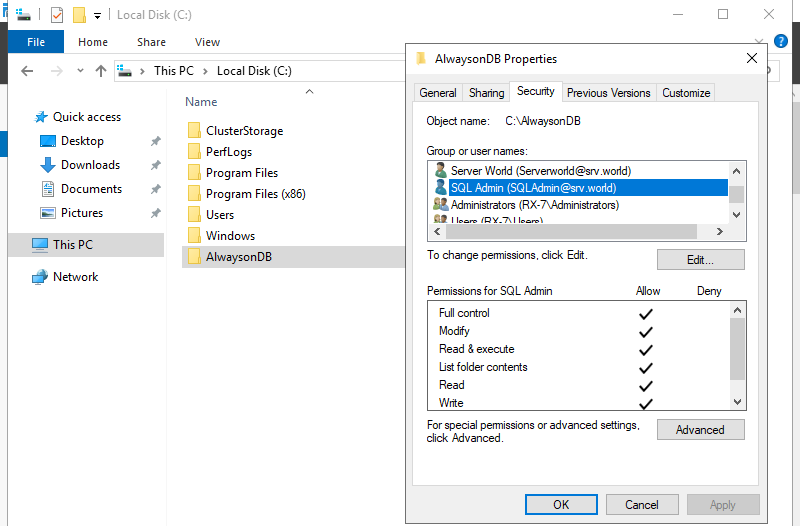
Step 9: Create a folder for the database of AlwaysOn Availability Groups on the same Path on all Nodes and also add full control permission to the SQL Server logon user.
It creates C:\AlwaysonDB on this example like follows.
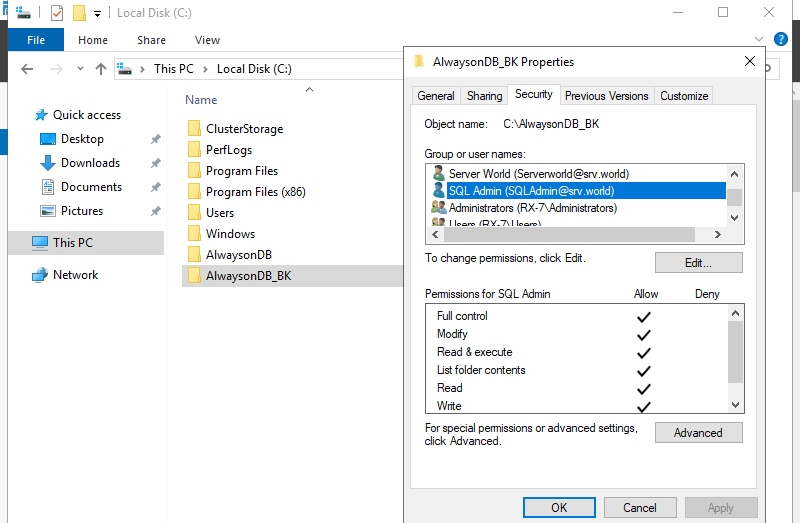
Step 10: Create a folder for the backup of database of AlwaysOn Availability Groups and also add full control permission to the SQL Server logon user.
It creates C:\AlwaysonDB_BK on this example like follows.
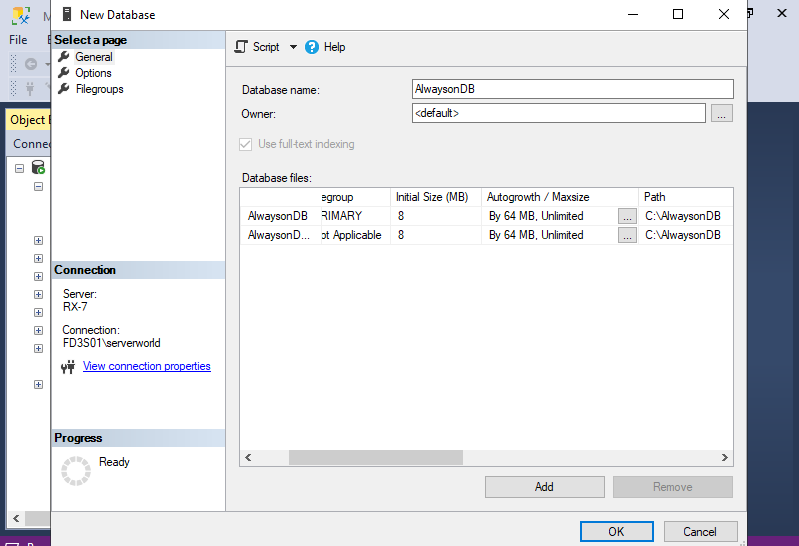
Step 11: Create a database of AlwaysOn Availability Groups with specifying the database folder you created on step 9.
It’s OK to create it only on primary Node.
It creates AlwaysonDB database on this example like follows.
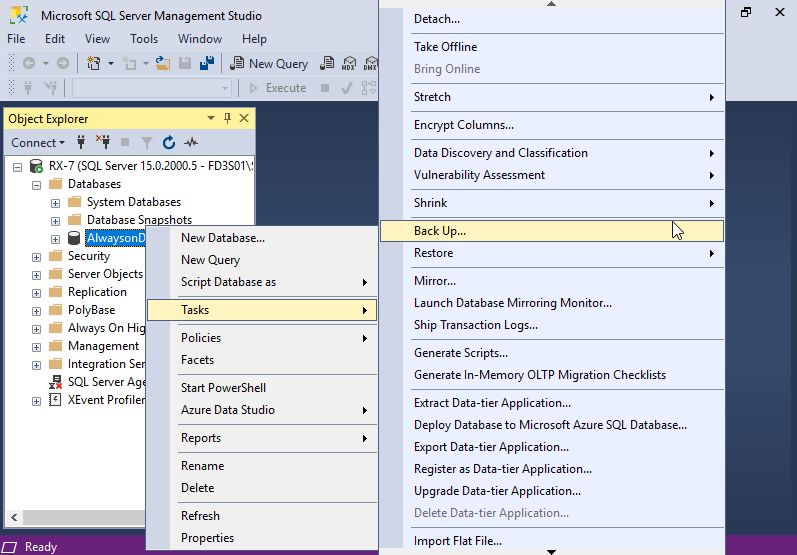
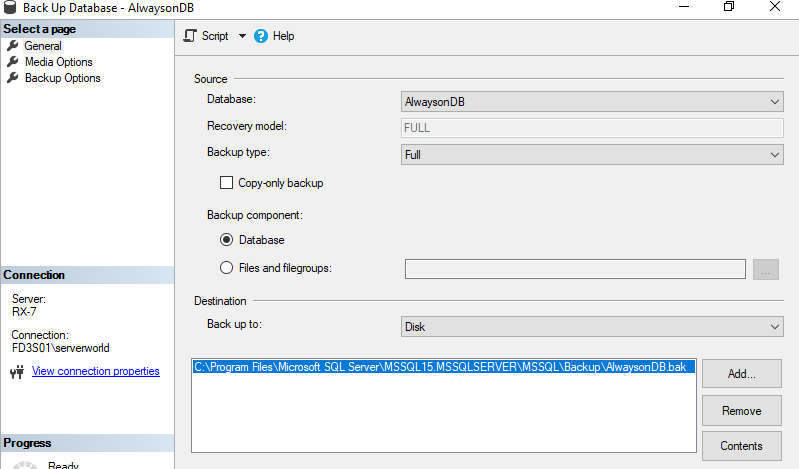
Step 12: Take a backup of the database for AlwaysOn Availability Groups.
Run SQL Server Management Studio (SSMS) and right click the target database to open the menu, then click Tasks -> Back Up.
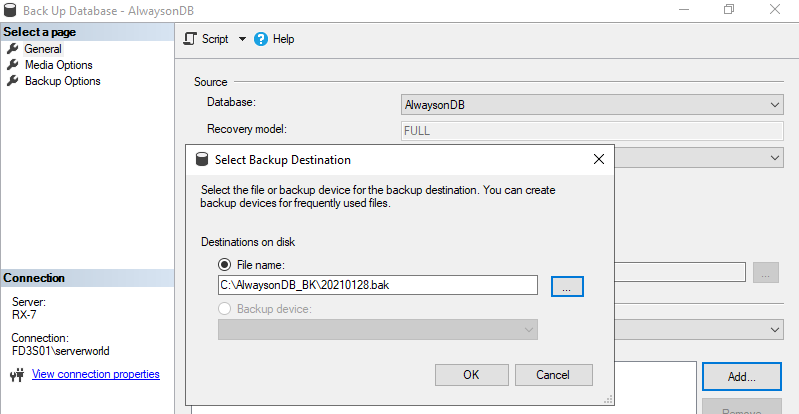
Step 13: Click Remove button on lower-right tp remove default backup folder, next, click Add button to specify backup folder path you created on Step 10.
Step 14: Input any backup file name and Click OK.
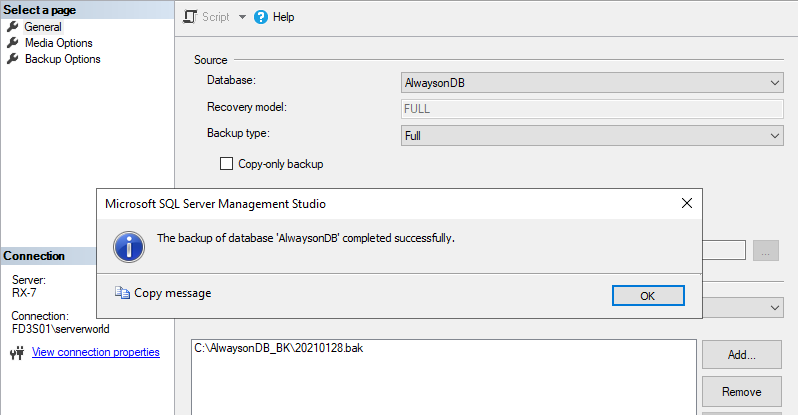
Step 15: It’s OK if taking backup has been finished successfully.
Next, Proceed to the settings of AlwaysOn Availability Groups #2.
AlwaysOn Availability Groups #2
Configure AlwaysOn Availability Groups.
This example is based on the environment with 2 SQL Servers like follows. (possible to configure with more than 3 SQL Servers)

Step 1: Configure AlwaysOn Availability Groups settings #1 first.
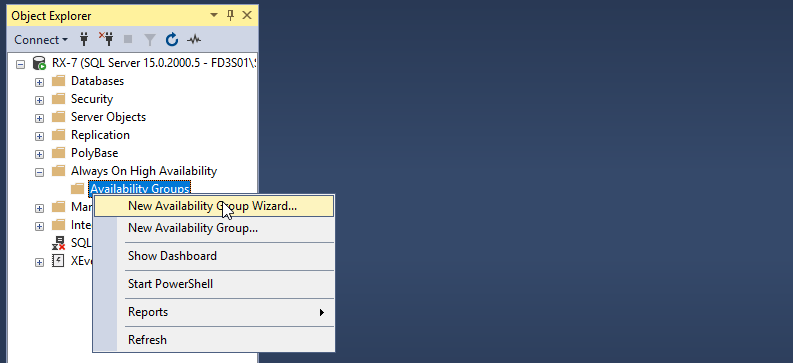
Step 2: Logon with the SQL Server logon account and run SQL Server Management Studio (SSMS) to connect to the primary node. Next, right click Always On High Availability -> Availability Groups to open the menu, then click New Availability Group Wizard.
Step 3: Click Next button.
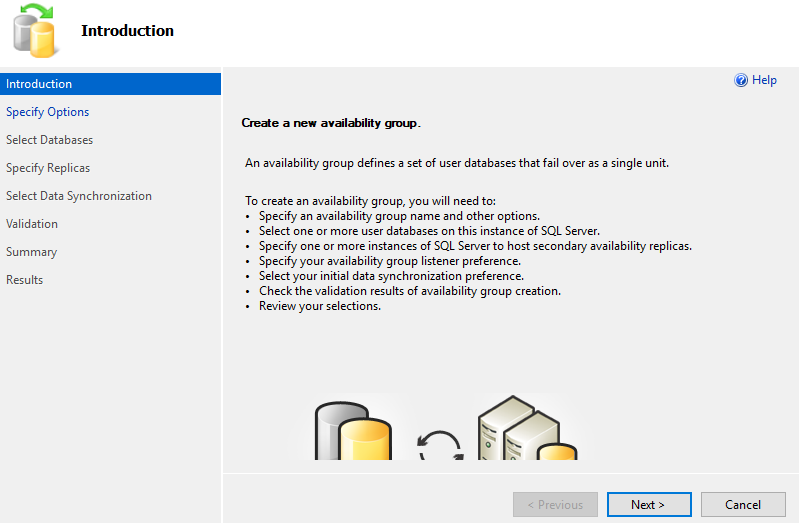
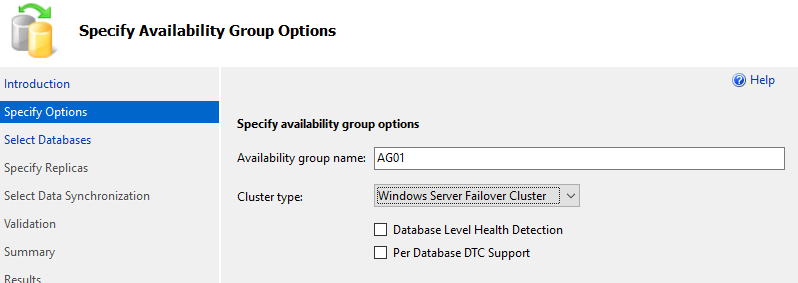
Step 4: Input any name you like on Availability group name and proceed to next.
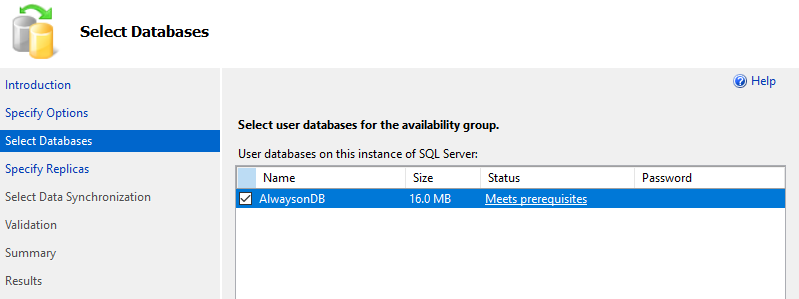
Step 5: Select databases for Alwayson availability group and proceed next.
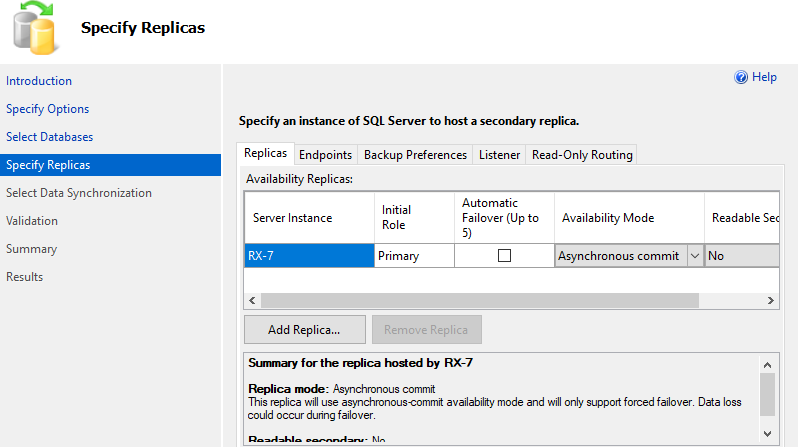
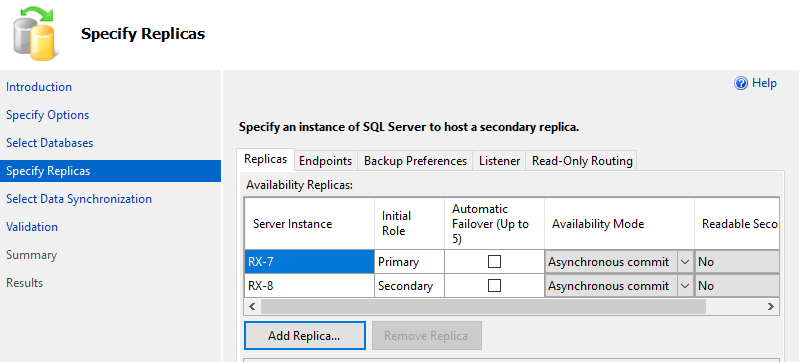
Step 6: Specify replicas. Click Add Replica button and specify replica Hosts. Proceed next.
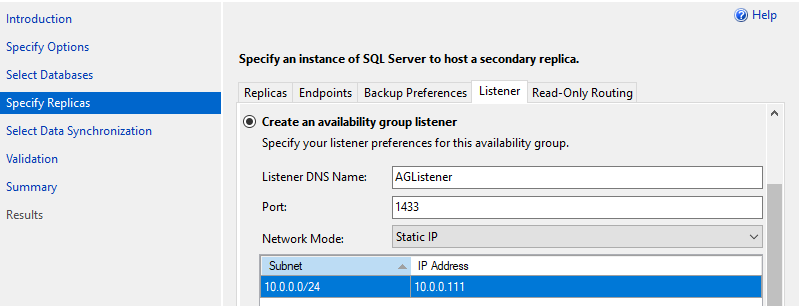
Step 7: After adding all replicas, move to the Listener tab.
Step 8: Input any listener name you like on Listener DNS Name and also input a listening port on Port field.
Furthermore, set an IP address for the listener.
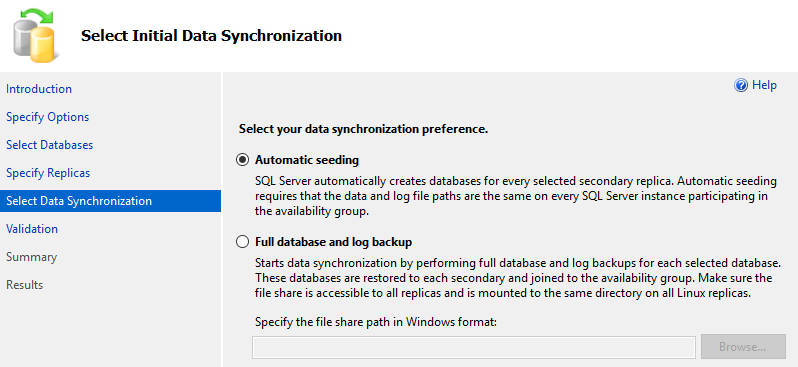
Step 9: Select data synchronization preference. It selects Automatic seeding on this example.
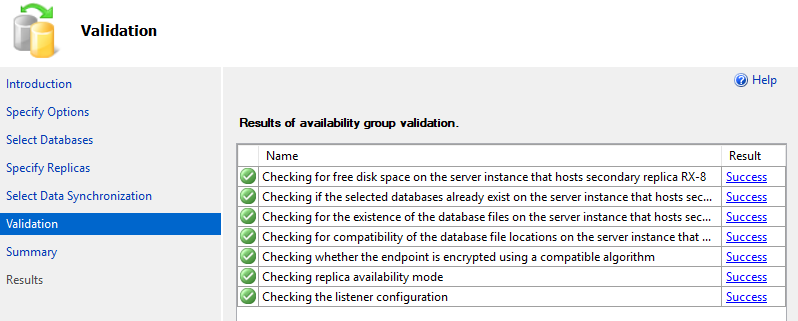
Step 10: The validation actions run before applying settings. That’s OK if all are Success.
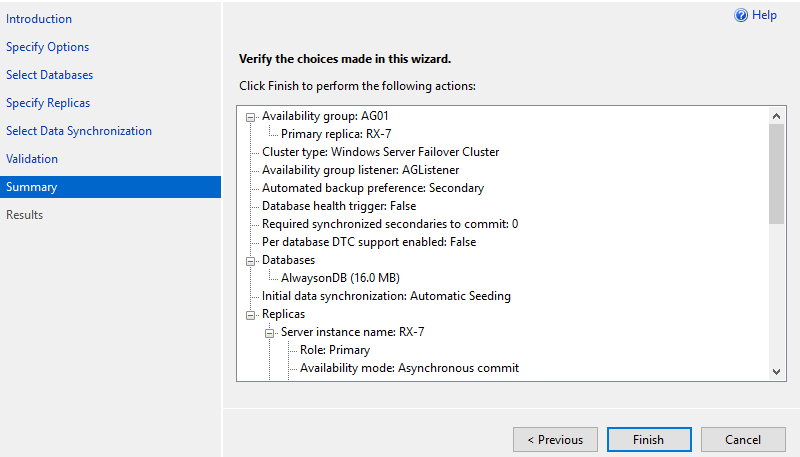
Step 11: Confirm summary of settings and if that’s OK, click Finish button to apply settings.
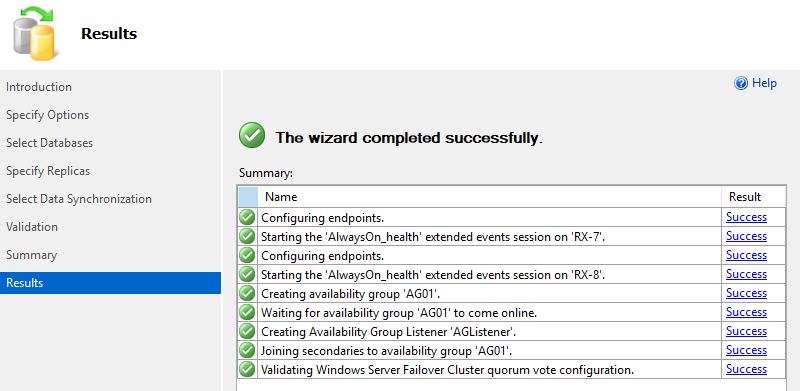
Step 12: After finishing successfully, click Close button.
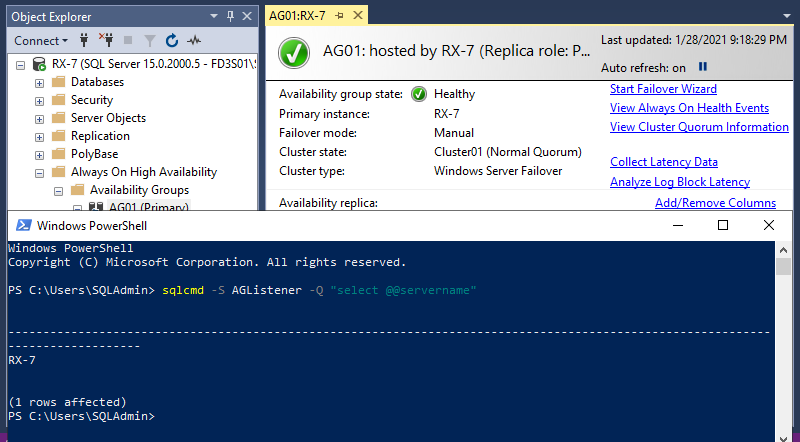
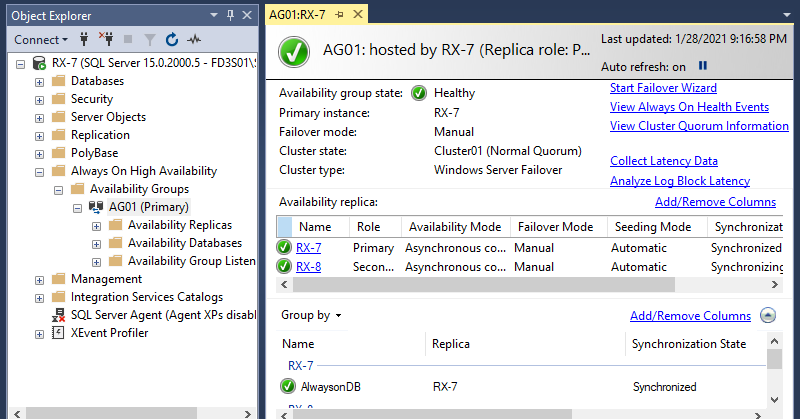
Step 13: It’s possible to see the status of Availability group on SSMS.
Step 14: Access to the listener to verify to connect to SQL Server.