Windows Admin Center is your remote management tool for Windows Server running anywhere–physical, virtual, on-premises, in Azure, or in a hosted environment–at no additional cost. Windows Admin Center offers “flexible, locally-deployed, browser-based management platform and tools”. The idea behind this project is to help simplify management of servers by placing a majority of the frequently referenced tools used by system administrators in one spot
Windows Admin Center is a new, locally-deployed, browser-based management tool set that lets you manage your Windows Servers with no Azure or cloud dependency. Windows Admin Center gives you full control over all aspects of your server infrastructure and is particularly useful for managing servers on private networks that are not connected to the Internet. Windows Admin Center is the modern evolution of “in-box” management tools, like Server Manager and MMC. It complements System Center – it’s not a replacement.
Windows Admin Center runs in a web browser and manages Windows Server 2019, Windows Server 2016, Windows Server 2012 R2, Windows Server 2012, Windows 10, Azure Stack HCI and more through the Windows Admin Center gateway installed on Windows Server or domain-joined Windows 10. The gateway manages servers by using Remote PowerShell and WMI over WinRM. The gateway is included with Windows Admin Center in a single lightweight .msi package that you can download. The Windows Admin Center gateway, when published to DNS and given access through corresponding corporate firewalls, lets you securely connect to, and manage, your servers from anywhere with Microsoft Edge or Google Chrome.

- Install Windows Admin Center
- Connect to Web Admin Console
- Add Target Hosts
- Overview of Tools/Items
Install Windows Admin Center
Install Windows Admin Center that is featured when Server Manager runs on Windows Server 2019.
It’s possible to Manage Windows Server Hosts and Client Hosts on it. (Refer to the official site below)
https://docs.microsoft.com/en-us/windows-server/manage/windows-admin-center/understand/what-is
If you manage only a Windows Host with Windows Admin Center, it’s OK to install Admin Center on it, but if you’d like to manage multiple Windows Hosts, it needs to install Admin Center on a Gateway Server. The Windows OS that you can install Admin Center with Gateway Mode are Windows Server 2016 and Windows Server 2019 now. By the way, Installing Admin Center on Domain Controller Hosts is not supported, so you need to choose to install Admin Cenetr as Gateway Server except DC. Anyway, Windows Admin Center does not require Domain Environmrnt, also possible to manage standalone Host on it.
Step 1: Download Windows Admin Center Installer from the official site below. There are latest release and stable release, select the one you like.
After downloading Installer, run it. First, Read terms of license agreement well and go Next.

Step 2: Select use Microsoft Update or not.

Step 3: Click Next button.

Step 4: Click Next button with keep default.

Step 5: Configure listening port and certificates for Windows Admin Center.

Step 6: Click Finish button to complete installation.

Connect to Web Admin Console
Connect to Web Admin Console of Windows Admin Center from Client Host.
Any Client Hosts are OK, but officially supported web browsers are Microsoft Edge and Google Chrome only, so it needs to access from Hosts that those browsers are installed. (on this example, use Microsoft Edge on Windows 10)
Step 1: Run Web browser and access to [https://(Windows Admin Center Hostname or IP address)]. Then, authentication is required, input any user who can access to Windows Admin Center Host.

Step 2: After logon successfully, Windows Admin Center Welcome page is shown.

Step 3: After finishing Welcome page, Windows Admin Center default page is shown and target Hosts are listed.

Step 4: When click a target Host, it’s possible to see status or modify settings of the Host.

Add Target Hosts
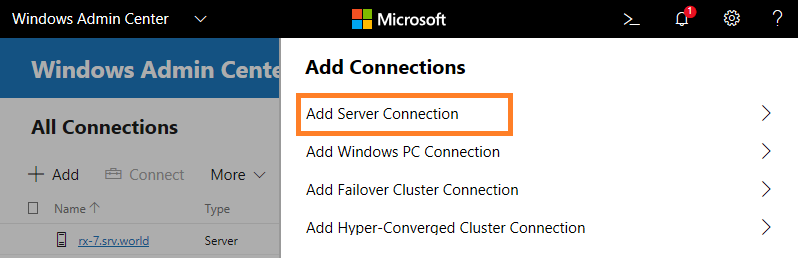
Step 1: Logon to Windows Admin Center and Click + Add link.

Step 2: Click Add Server Connection.
Step 3: Input a Hostname you’d like to add.

Step 4: By the way, if Admin Center Host can not resolve the name of the Host you’d like to add, check a box Don’t attempt to resolve the server name and specify the IP address of the Host.

Step 5: Input Credentials for the Host and Click Submit with Credentials button.

Step 6: A new Target Host has been added like follows.

Step 7: If Admin Center can connect to the new Host successfully, Status of the Host is displayed like follows.

Overview of Tools/Items
Opt 1: For Overview on the left pane, it’s possible to see the current status of the Host like CPU usage or Memory usage and so on.

Opt 2: For Backup on the left pane, it’s possible to configure Backup with Azure Backup.

Opt 3: For Certificates on the left pane, it’s possible to manage stored Certificates.

Opt 4: For Devices on the left pane, it’s possible to manage Devices, it’s the same feature with Windows Device Manager.

Opt 5: For Events on the left pane, it’s possible to see each Log, it’s the same feature with Windows Event Viewer.

Opt 6: For Files on the left pane, it’s possible to manage files and folders, it’s the same feature with Windows Explorer.

Opt 7: For Firewall on the left pane, it’s possible to manage settings of Firewall, it’s the same feature with Windows Defender Firewall.

Opt 8: For Installed Apps on the left pane, it’s possible to manage Installed applications.

Opt 9: For Local Users and Groups on the left pane, it’s possible to manage Local Users and Groups.

Opt 10: For Network on the left pane, it’s possible to configure Network Interfaces.

Opt 11: For PowerShell on the left pane, it’s possible to manage or configure the target Host with PowerShell Cmdlets directly.

Opt 12: For Processes on the left pane, it’s possible to manage processes.

Opt 13: For Registry on the left pane, it’s possible to manage Registry Keys.

Opt 14: For Remote Desktop on the left pane, it’s possible to connect to the target Host with Remote Desktop. It needs Remote Desktop is enabled on the target Host first.

Opt 15: For Roles and Features on the left pane, it’s possible to install or remove Roles and Features.

Opt 16: For Scheduled Tasks on the left pane, it’s possible to manage tasks, it’s the same feature with Windows Task Scheduler.

Opt 17: For Services on the left pane, it’s possible to start or stop services.

Opt 18: For Storage on the left pane, it’s possible to manage disks that are attached on target Host.

Opt 19: For Storage Replica on the left pane, it’s possible to install and configure Storage Replication feature.

Opt 20: For Updates on the left pane, it’s possible to manage Windows Updated programs.

Opt 21: For Settings on the left pane, it’s possible to configure Environment Variables or Remote Desktop setting and also Access Controls on the target Host.