The Domain Name System (DNS) is the phonebook of the Internet. When users type domain names such as ‘google.com’ or ‘nytimes.com’ into web browsers, DNS is responsible for finding the correct IP address for those sites. Browsers then use those addresses to communicate with origin servers or CDN edge servers to access website information. This all happens thanks to DNS servers: machines dedicated to answering DNS queries.
DNS is a hierarchical and decentralized naming system for computers, services, or other resources connected to the Internet or a private network. It associates various information with domain names assigned to each of the participating entities. Most prominently, it translates more readily memorized domain names to the numerical IP addresses needed for locating and identifying computer services and devices with the underlying network protocols. The Domain Name System delegates the responsibility of assigning domain names and mapping those names to Internet resources by designating authoritative name servers for each domain. Network administrators may delegate authority over sub-domains of their allocated name space to other name servers. This mechanism provides distributed and fault-tolerant service and was designed to avoid a single large central database.
The Domain Name System also specifies the technical functionality of the database service that is at its core. It defines the DNS protocol, a detailed specification of the data structures and data communication exchanges used in the DNS, as part of the Internet Protocol Suite. The Internet maintains two principal namespaces, the domain name hierarchy and the Internet Protocol (IP) address spaces. The Domain Name System maintains the domain name hierarchy and provides translation services between it and the address spaces. Internet name servers and a communication protocol implement the Domain Name System. A DNS name server is a server that stores the DNS records for a domain; a DNS name server responds with answers to queries against its database.
- DNS Server : Install
- Add Forward lookup Zone
- Add Reverse lookup Zone
- Add A/PTR record
- Verify resolving
- Add MX record
- Add CNAME record
- Configure Secondary Zone
- Configure Stub Zone
- Set Forwarder
- Set Conditional Forwarder
Install DNS Server
Configure DNS Server to provide feature of resolving Hostname or IP Address.
On CUI installation, set like follows.
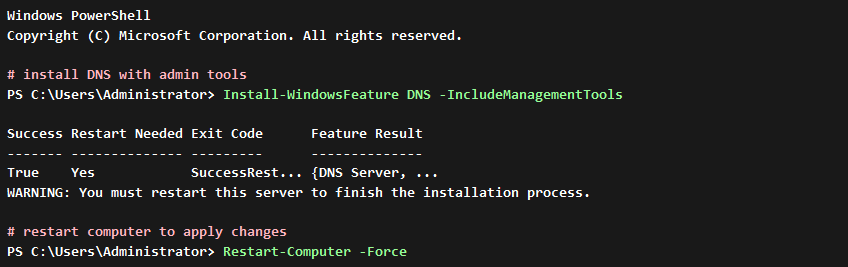
Run PowerShell with Admin Privilege and Install DNS Server.
On GUI installation, set like follows.
Step 1: Run Server Manager and Click Add roles and features. And select Next
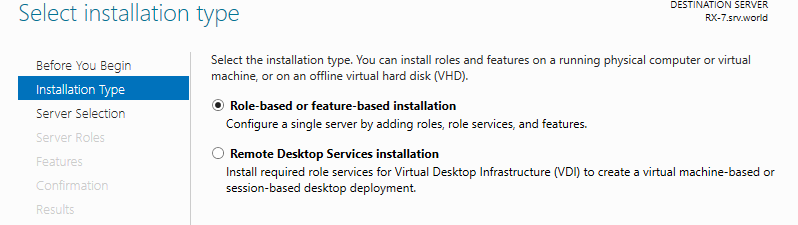
Step 2: Select Role-based or feature-based installation.
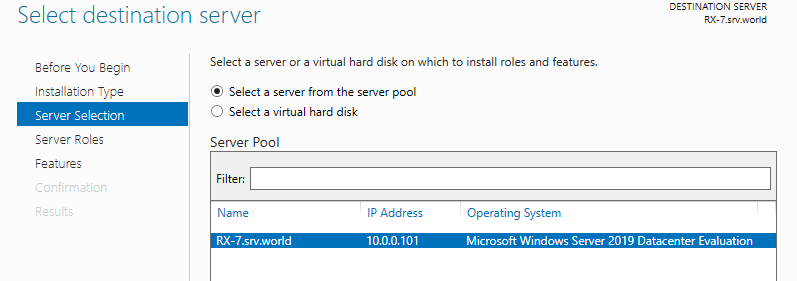
Step 3: Select a Host which you’d like to add services.
Step 4: Check a box DNS Server.

Step 5: Additional features are required to add DNS Server. Click Add Features button and then Click Next button.

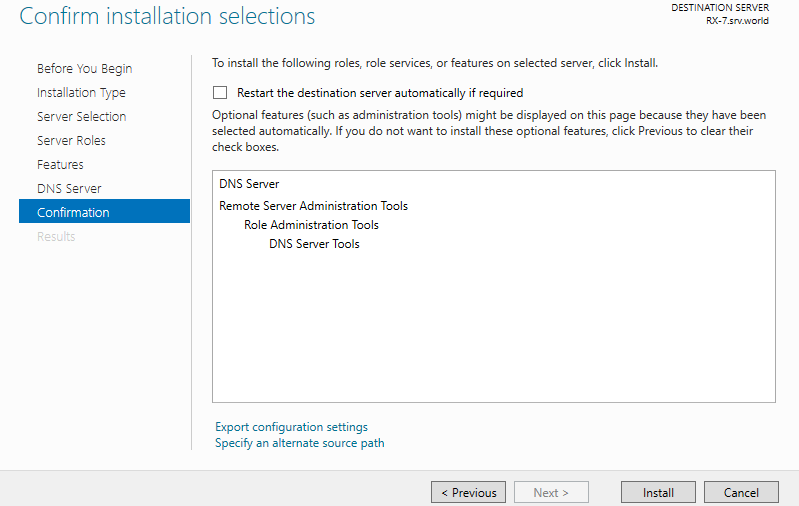
Step 6: Click Next – > Next button on feature and DNS server tab and click Install.
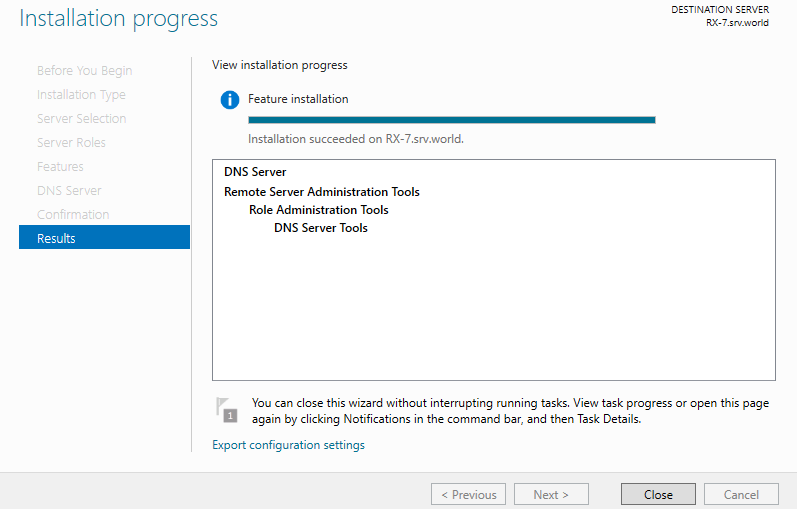
Step 7: After finishing Installation, click Close button.
Add Forward lookup Zone
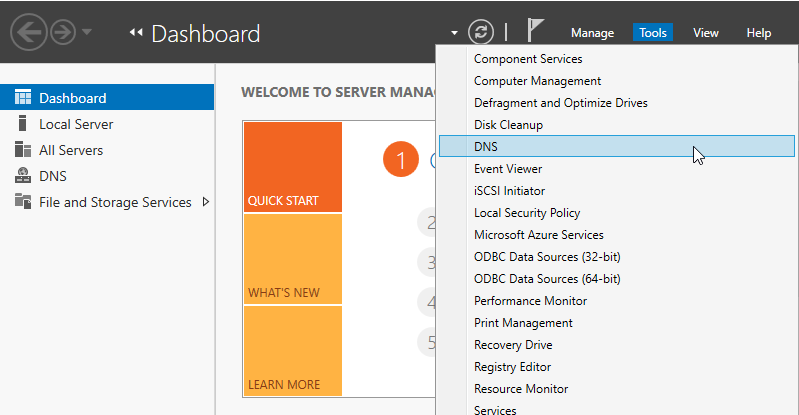
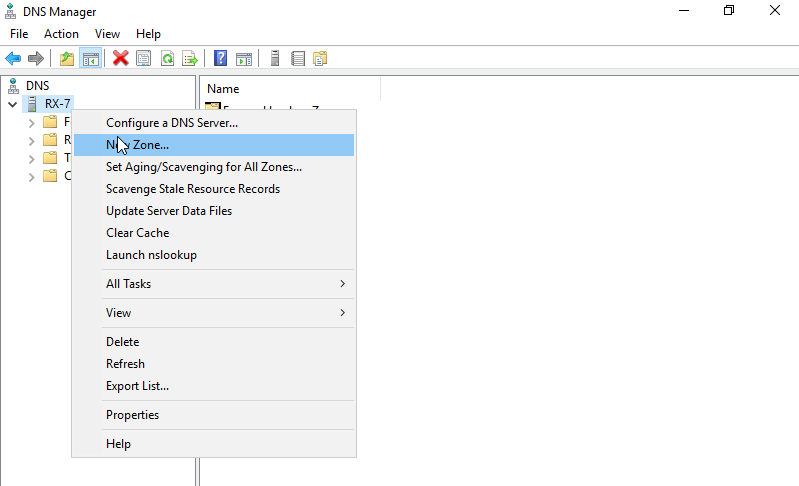
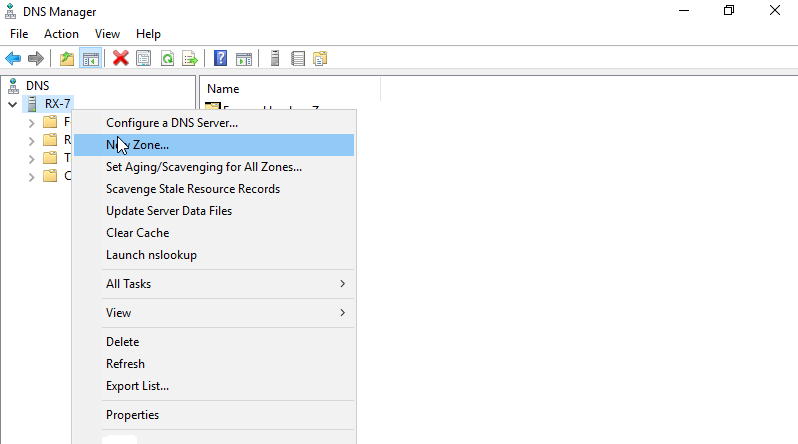
Step 1: Run Server Manager and select Tools -> DNS.
Step 2: Select own Hostname on the left pane and right-click the own Hostname to show menu on the left pane, then select New Zone….
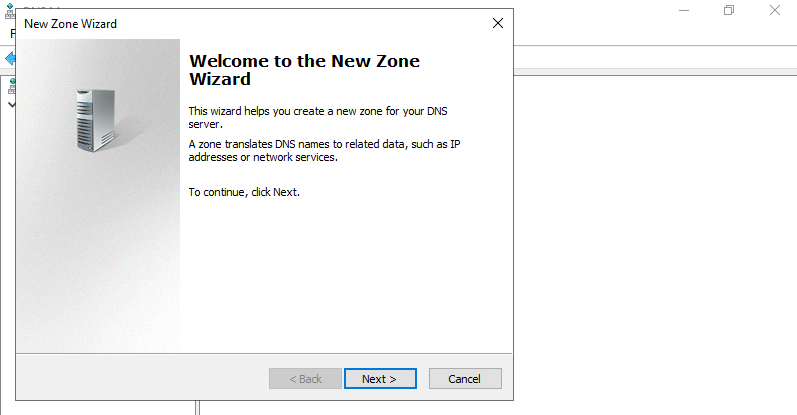
Step 3: Click Next button.
Step 4: Check a box Primary zone and click Next button.

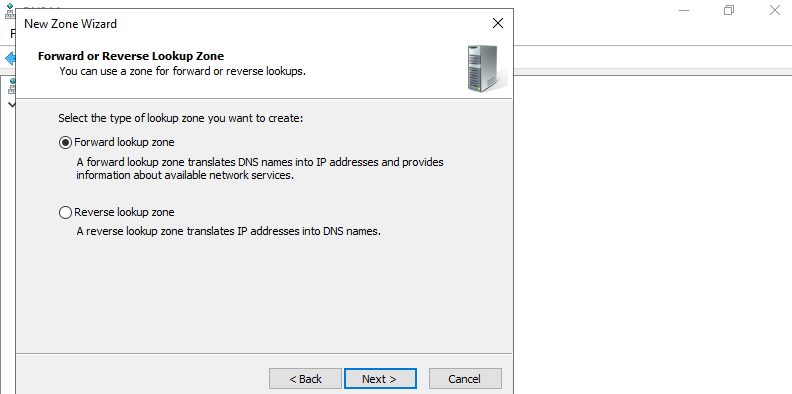
Step 5: Check a box Forward lookup Zone and click Next button.
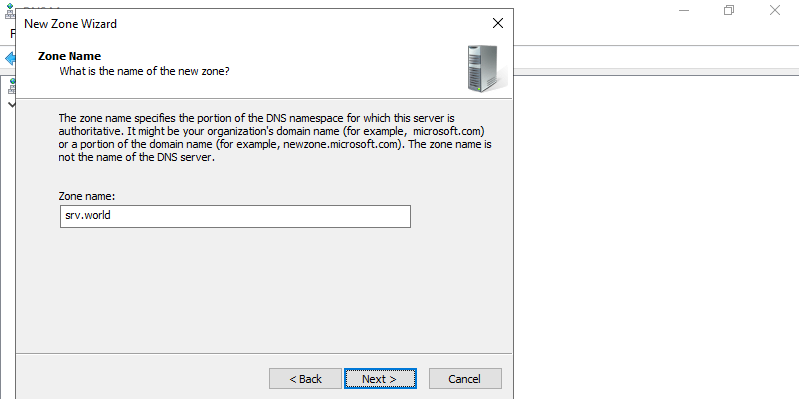
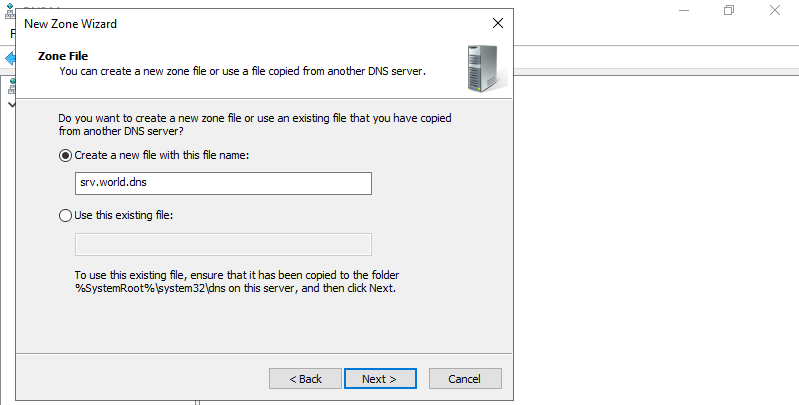
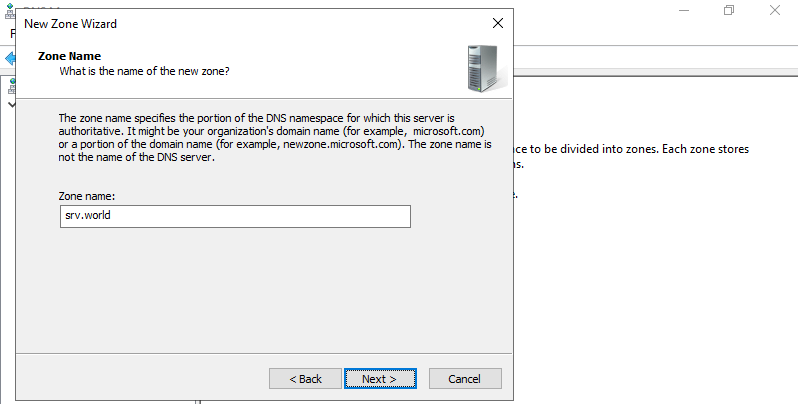
Step 6: Input Zone name. As the description on the screen-shot below, set domain name or portion of domain name for this zone name.
Step 7: Set zone-file-name and click Next button. It’s OK to keep default for zone-file-name.
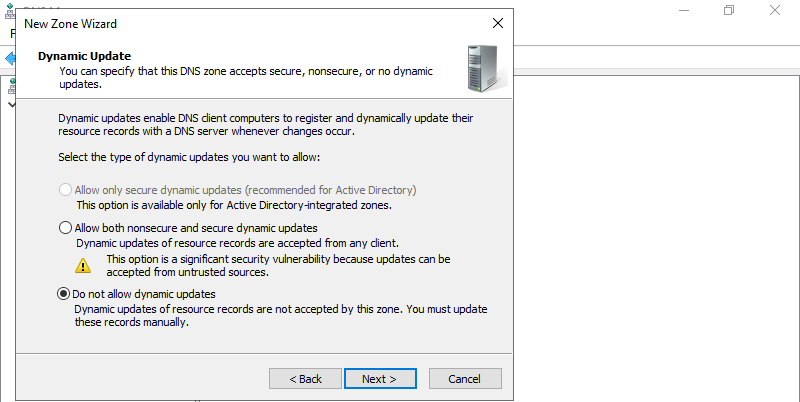
Step 8: Click Next button with keeping default.
Step 9: Click Finish button.
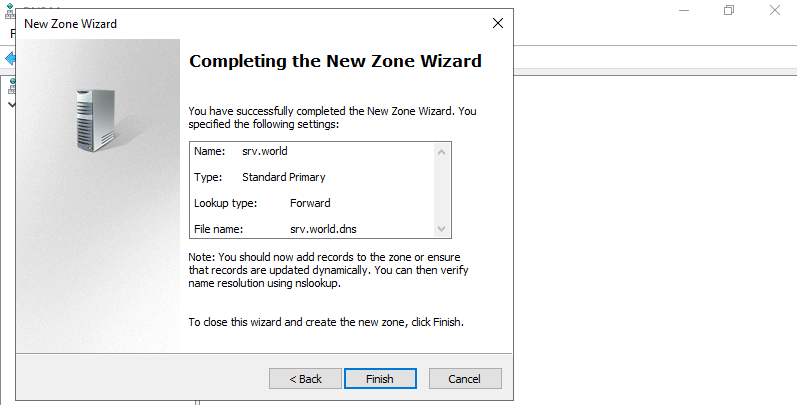
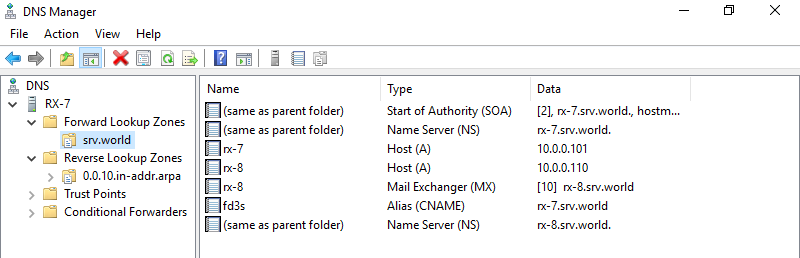
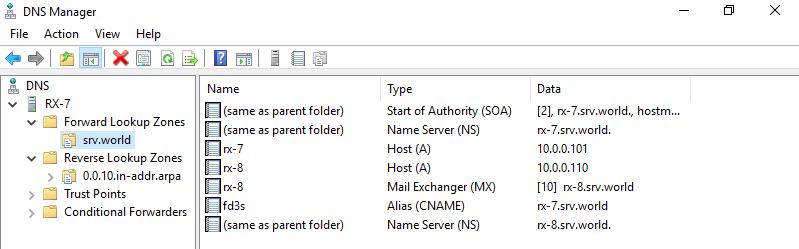
Step 10: A new zone has been created under the Forward lookup Zone.
Add Reverse lookup Zone
Step 1: Run Server Manager and select Tools – DNS.

Step 2: Select own Hostname on the left pane and right-click the own Hostname to show menu on the left pane, then select New Zone….
Step 3: Click Next button.

Step 4: Check a box Primary zone and click Next button.
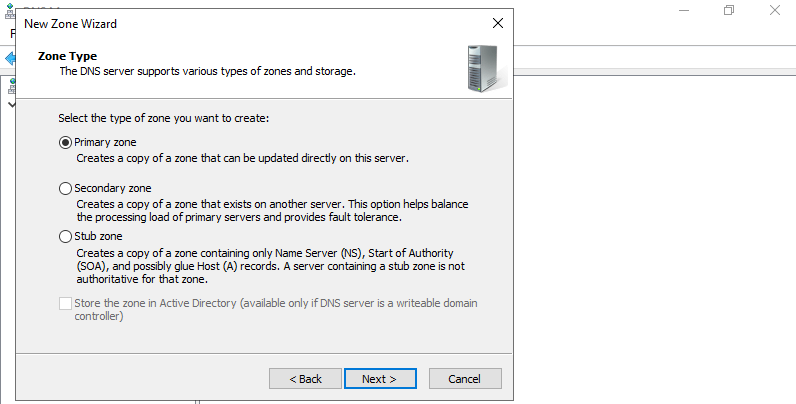
Step 5: Check a box Reverse lookup Zone and click Next button.

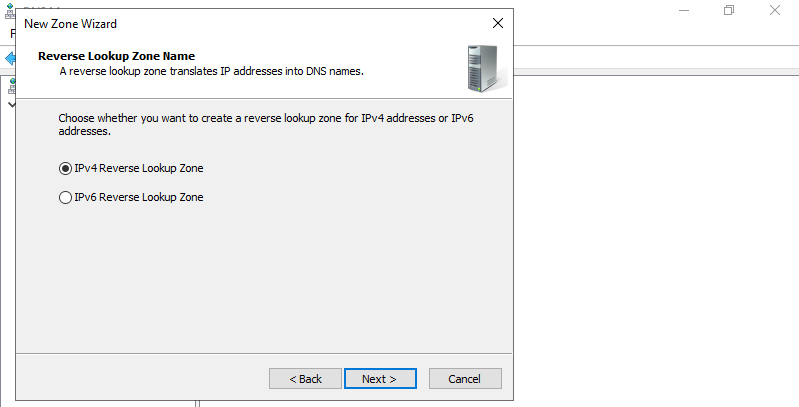
Step 6: On this example, configure IPv4 zone, Check a box IPv4 Reverse lookup Zone and click Next button.
Step 7: Input [Network ID]. The example follows is for the case 10.0.0.0/24.

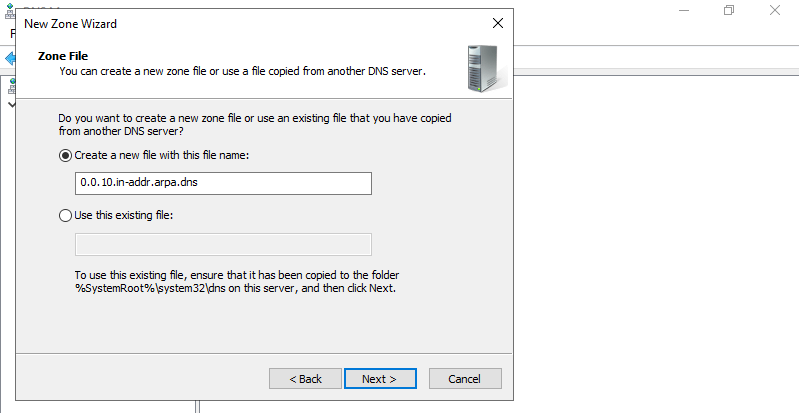
Step 8: Set zone-file-name and click Next button. It’s OK to keep default for zone-file-name.
Step 9: Click Next button with keeping default.

Step 10: Click Finish button.

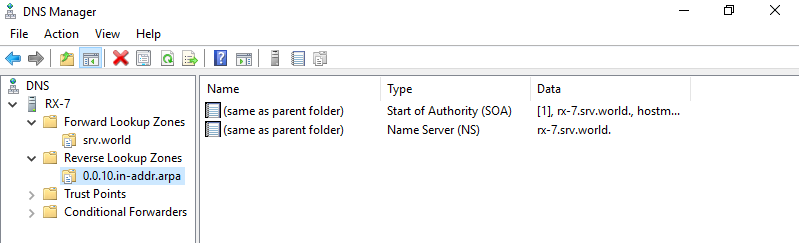
Step 11: A new zone has been added under the Reverse lookup Zone.
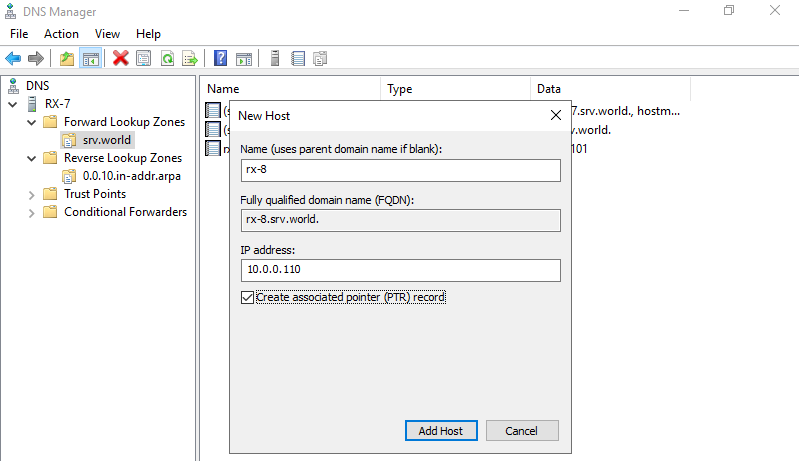
Add A/PTR record
On GUI installation, Do like follows.
Step 1: Run Server Manager and select Tools -> DNS, next right-click the own domain name to show menu on the left pane, then select New Host(A or AAA)….

Step 2: Input Hostname and IP address you’d like to add.
Furthermore, check a box Create associated pointer (PTR) record.
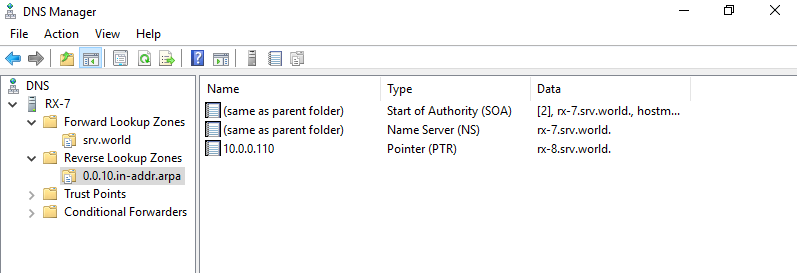
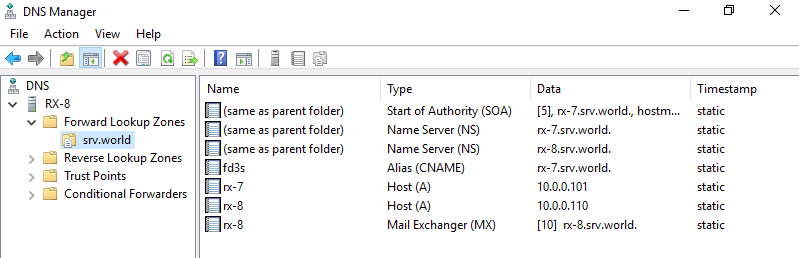
Step 3: A new A/PTR record has been just added.
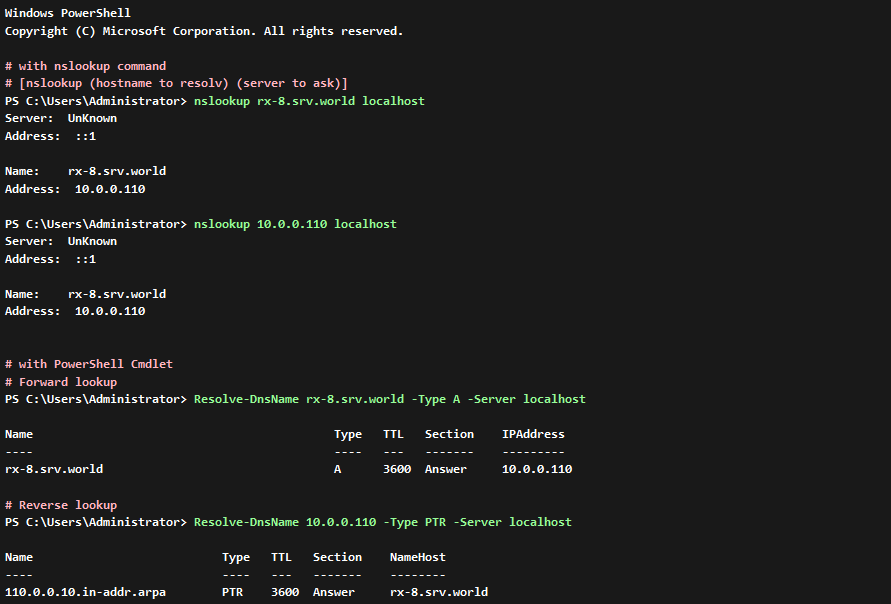
Verify resolving
erify resolving Hostname or IP address.
Run PowerShell with Admin Privilege and make sure like follows.
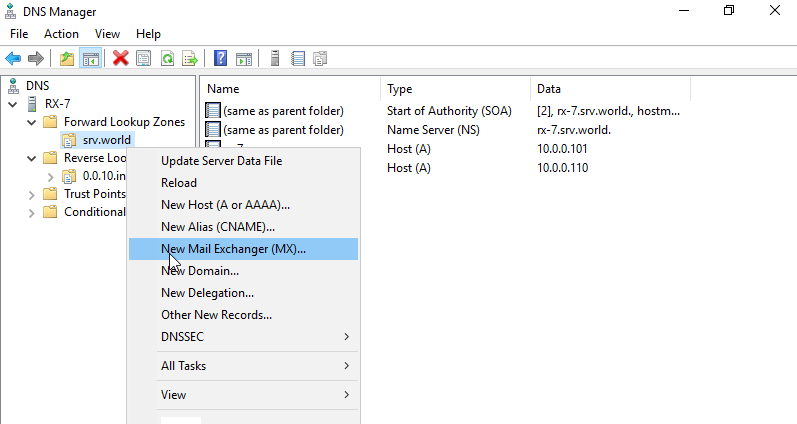
Add MX record
Step 1: Run Server Manager and select Tools -> DNS] next right-click the own domain name to show menu on the left pane, then select New Mail Exchanger(MX)….
Step 2: Input Hostname and FQDN of Mail exchanger like follows.
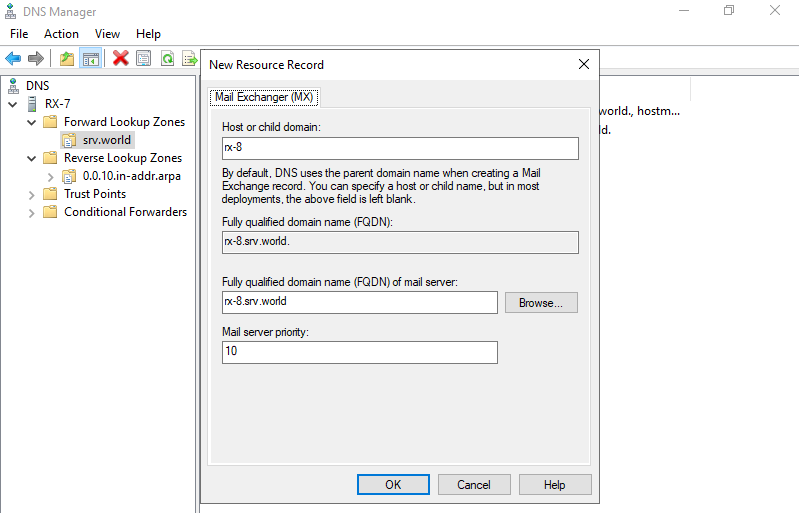
Step 3: A new Mail exchanger record has been just added.
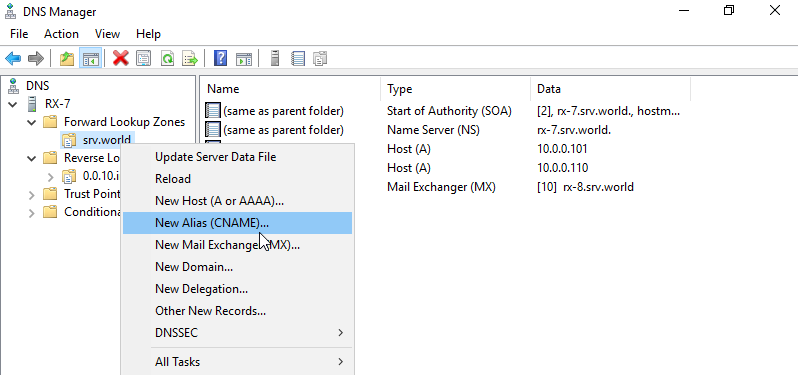
Add CNAME record
Step 1: Run Server Manager and select Tools -> DNS, next right-click the own domain name to show menu on the left pane, then select New Alias (CNAME)….

Step 2: Input Alias name and FQDN, and also target Hostname like follows.
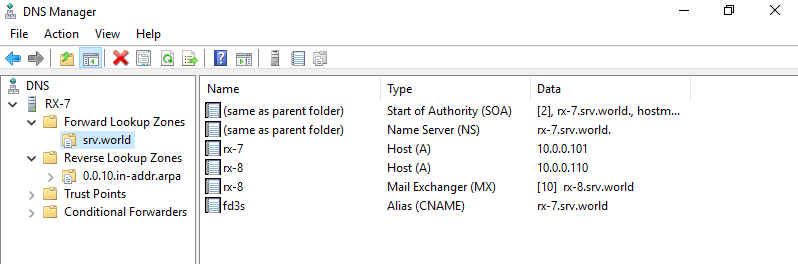
Step 3: A new CNAME record has been just added.
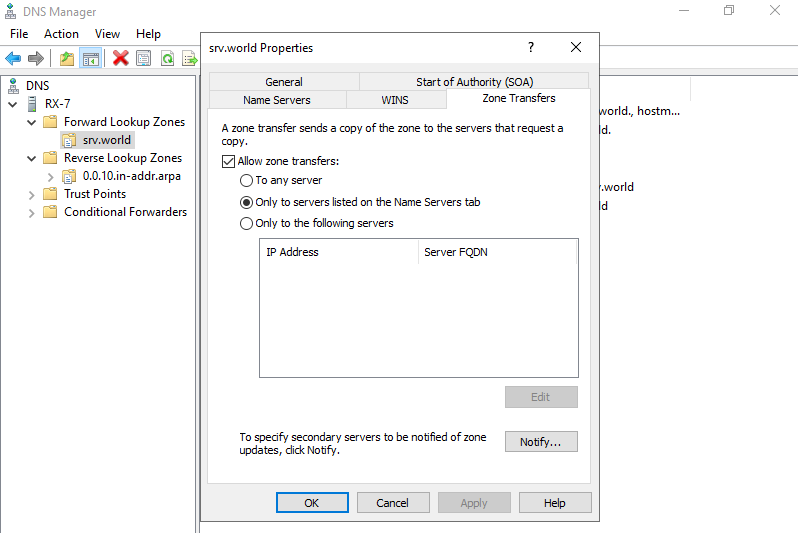
Configure Secondary Zone
Step 1: Configure on DNS Master Host.
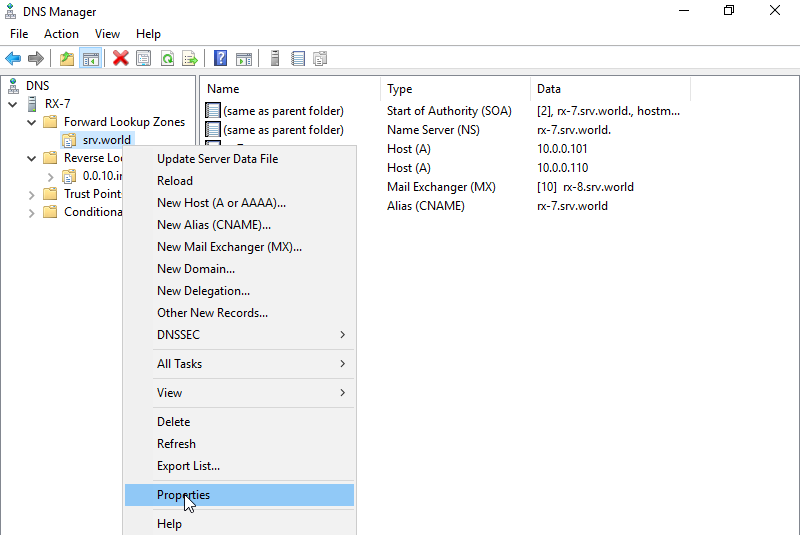
Run Server Manager and select Tools -> DNS, next right-click the zone name you’d like to add secondary zone and select Properties.
Step 2: Move to Zone Transfers tab, then it’s possible to see the setting like follows. Move to Name Servers tab.
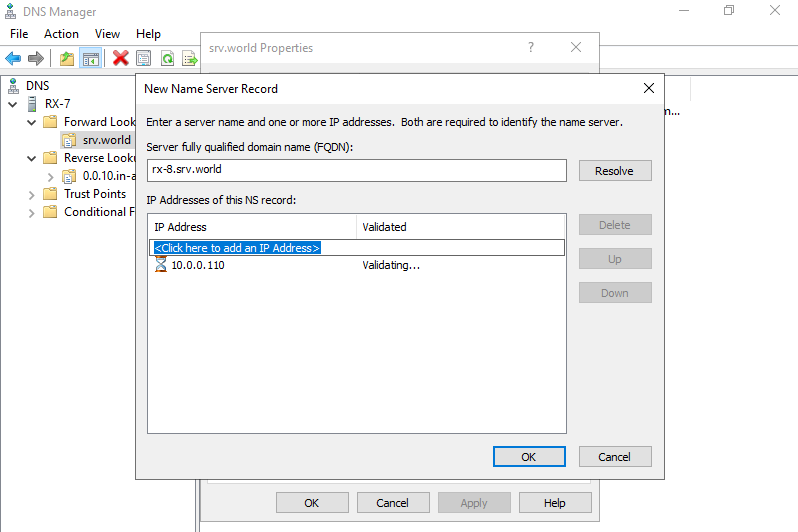
Step 3: Click Add button.
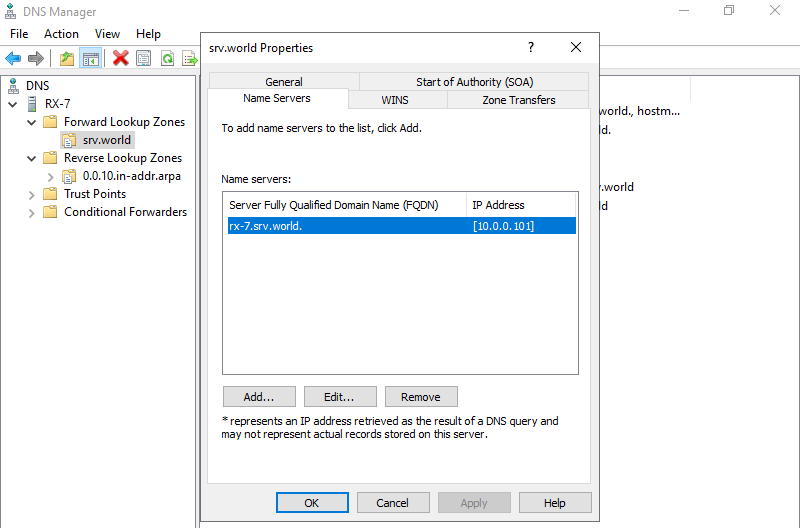
Step 4: Input Hostname and IP address of Secondary Server and Click OK.

Step 5: Name Server has been added. next, Move to DNS Secondary Host.
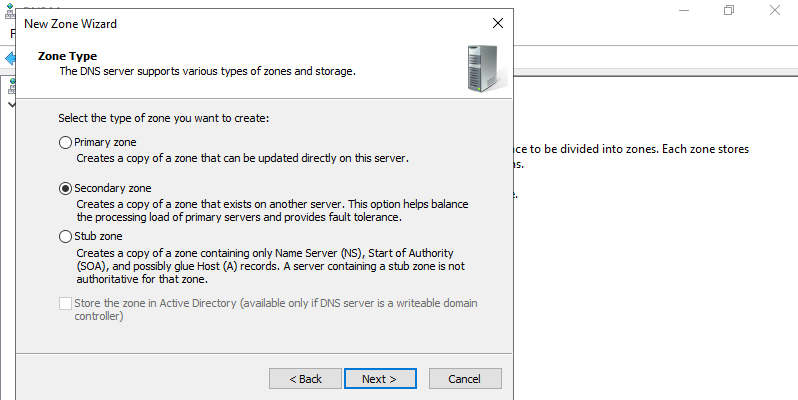
Step 6: On DNS Secondary Host, Run Server Manager and select Tools -> DNS, next right-click the zone you’d like to add secondary zone and select New Zone….

Step 7: Click Next button.

Step 8: Check a Box Secondary zone and go Next.
Step 9: Input a zone name you’d like to add secondary replica and go Next.
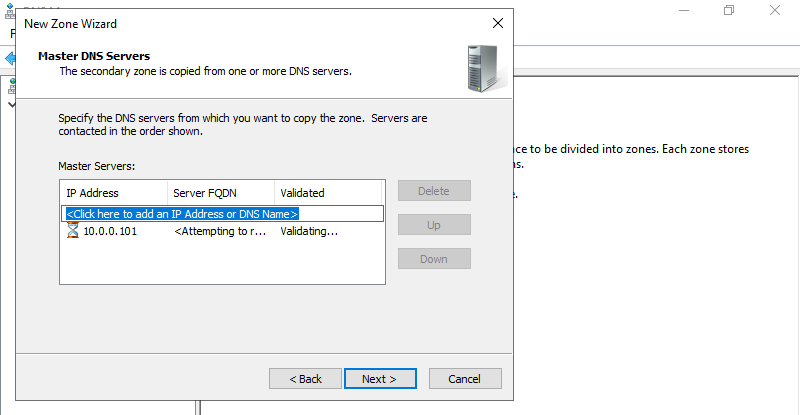
Step 10: Input DNS Master Host’s IP address and go Next.
Step 11: Click Finish button. Zone files are transferred on secondary Host if settings are OK.
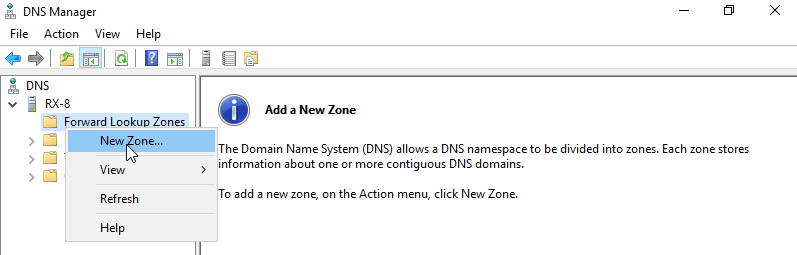
Configure Stub Zone
Step 1: Configure on DNS Master Host.
Run Server Manager and select Tools -> DNS, next right-click the zone name you’d like to add secondary zone and select Properties.

Step 2: Move to Zone Transfers tab, then it’s possible to see the setting like follows. Move to Name Servers tab.

Step 3: Click Add button.

Step 4: Input Hostname and IP address of Secondary Server and Click OK.
Step 5: Name Server has been added. next, Move to DNS Stub Host.
Step 6: On DNS Stub Host, Run Server Manager and select Tools -> DNS, next right-click the zone you’d like to add stub zone and select New Zone….
Step 7: Click Next button.

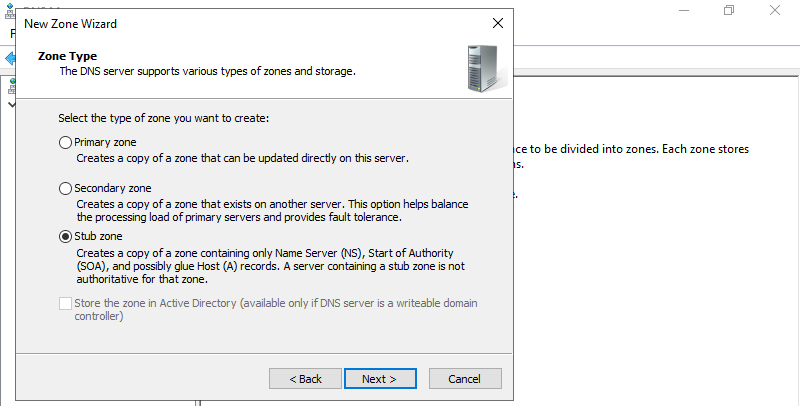
Step 8: Check a Box Stub zone and go Next.
Step 9: Input a zone name you’d like to add stub zone and go Next.

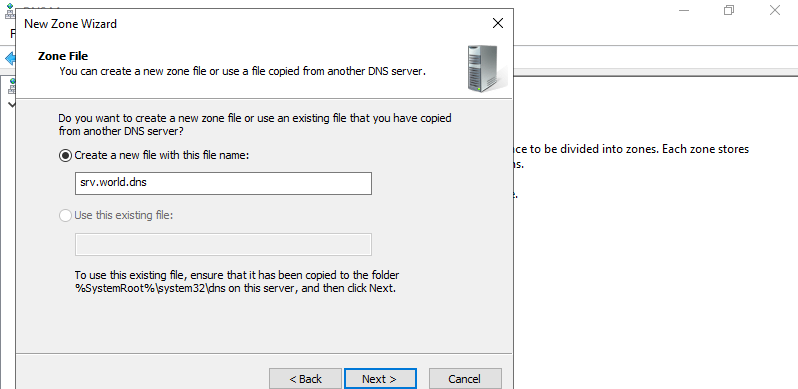
Step 10: Specify zone-file name and go Next.
Step 11: Input DNS Master Host’s IP address and go Next.

Step 12: Click Finish button.
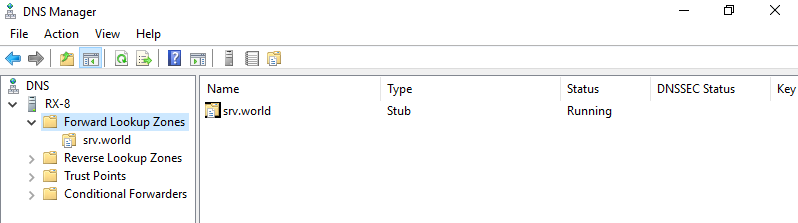
Step 13: Zone files are transferred and configured as Stub Zone.
Set Forwarder
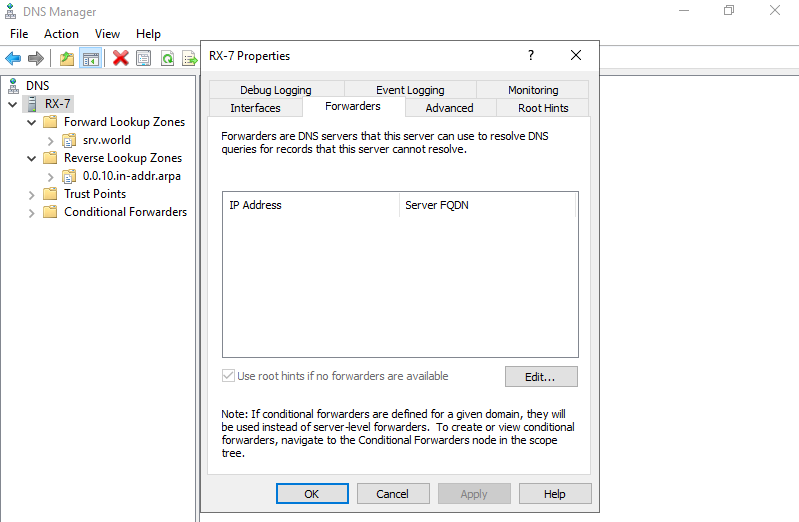
Step 1: Run Server Manager and select Tools -> DNS, next right-click the Hostname and select Properties.

Step 2: Move to Forwarders tab and Click Edit button.
Step 3: Input Hostname or Ip address you’d like to set as a Forwarder.
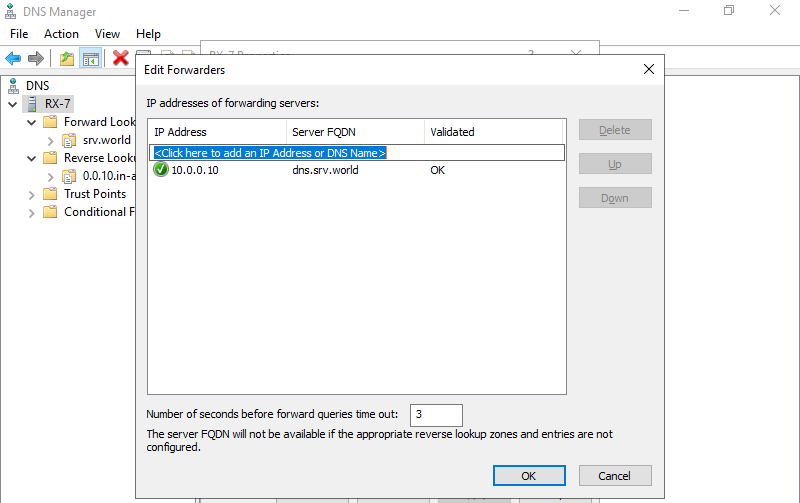
Step 4: DNS Forwarder is just added.
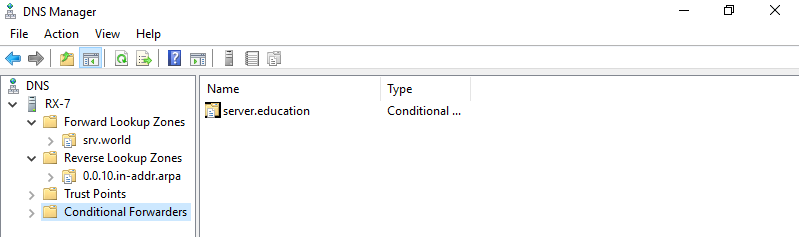
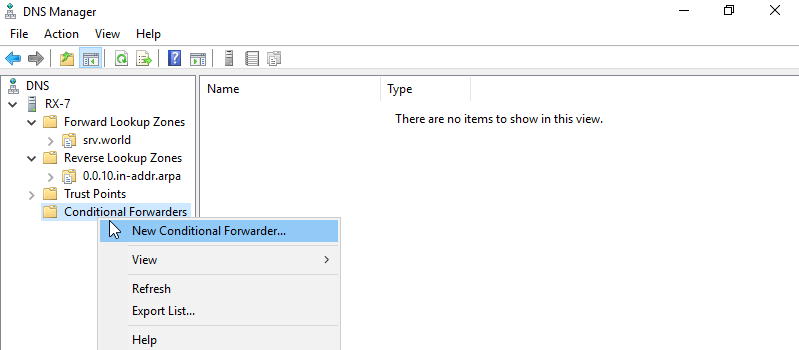
Set Conditional Forwarder
Step 1: Run Server Manager and select Tools -> DNS, next right-click Conditional Forwarders and select New Conditional Forwarder.
Step 2: Input a domain name you’d like to transfer queries of resolving and also input transfer target DNS Server’s hostname or IP address.
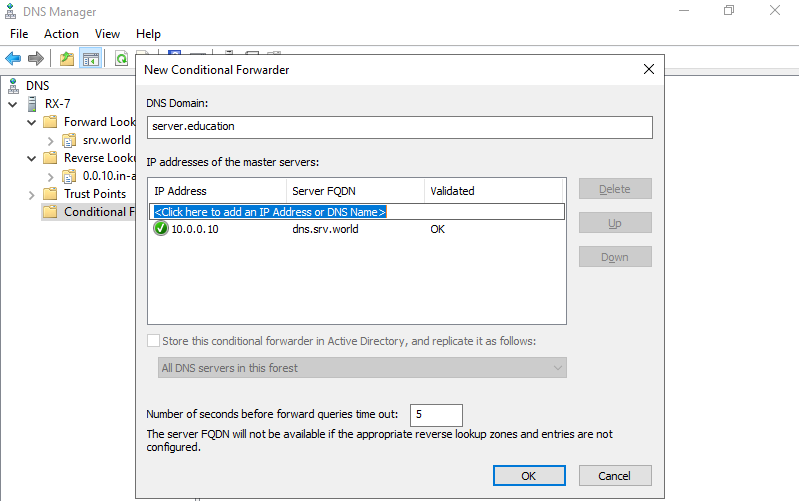
Step 3: Conditional Forwarder has been added.