
SNMP is an application layer protocol that provides a message format for communication between what are termed managers and agents. An SNMP manager is a network management application running on a PC or server, with that host typically being called a Network Management Station (NMS). Many SNMP agents exist in the network, one per device that is managed. The SNMP agent is software running inside each device (router, switch, and so on), with knowledge of all the variables on that device that describe the device’s configuration, status, and counters. The SNMP manager uses SNMP protocols to communicate with each SNMP agent.
Each agent keeps a database of variables that make up the parameters, status, and counters for the operations of the device. This database, called the Management Information Base (MIB), has some core elements in common across most networking devices. It also has a large number of variables unique to that type of device—for instance, router MIBs will include variables not needed on switch MIBs, and vice versa.
First, many companies sell SNMP management products—for example, the Cisco Prime series of management products (www.cisco.com/go/prime) use SNMP (and other protocols) to manage networks. IOS on routers and switches include an SNMP agent, with built-in MIB, that can be enabled with the configuration.

SNMP Variable Reading and Writing: SNMP Get and Set
The NMS typically polls the SNMP agent on each device. The NMS can notify the human user in front of the PC or send emails, texts, and so on to notify the network operations staff of any issues identified by the data found by polling the devices. You can even reconfigure the device through these SNMP variables in the MIB if you permit this level of control.
Specifically, the NMS uses the SNMP Get, GetNext, and GetBulk messages (together referenced simply as Get messages) to ask for information from an agent. The NMS sends an SNMP Set message to write variables on the SNMP agent as a means to change the configuration of the device. These messages come in pairs, with, for instance, a Get Request asking the agent for the contents of a variable, and the Get Response supplying that information.

SNMP permits much flexibility in how you monitor variables in the MIB. Most commonly, a network administrator gathers and stores statistics over time using the NMS. The NMS, with the stored data, can then analyze various statistical facts such as averages, minimums, and maximums. To be proactive, administrators can set thresholds for certain key variables, telling the NMS to send a notification (email, text, and so on) when a threshold is passed.
SNMP Notifications: Traps and Informs
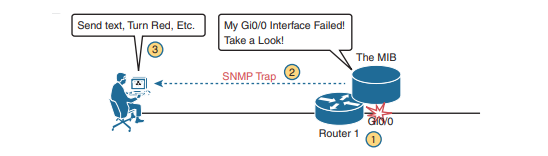
In addition to asking for information with Get commands and setting variables on agents with the Set command, SNMP agents can initiate communications to the NMS. These messages, generally called notifications, use two specific SNMP messages: Trap and Inform. SNMP agents send a Trap or Inform SNMP message to the NMS to list the state of certain MIB variables when those variables reach a certain state. With Traps configured, the router would send an SNMP Trap message to the NMS, with that Trap message noting the down state of the G0/0 interface. Then, the NMS software can send a text message to the network support staff, pop up a window on the NMS screen, change the color of the correct router icon to red on the graphical interface, and so on.
SNMP Traps and Inform messages have the exact same purpose but differ in the protocol mechanisms. SNMP Traps, available since the first version of SNMP from the late 1980s (SNMP Version 1, or SNMPv1), use a fire-and-forget process. The SNMP agent sends the Trap to the IP address of the NMS, with UDP as the transport protocol as with all SNMP messages, and with no application layer error recovery. If the Trap arrives, great; if it is lost in transit, it is lost.
Inform messages are like Trap messages but with reliability added. Added to the protocol with SNMP Version 2 (SNMPv2), Informs still use UDP but add application layer reliability.
The NMS must acknowledge receipt of the Inform with an SNMP Response message, or the SNMP agent will time out and resend the Inform.
Note that Traps and Informs both have a useful role today, and Traps are still frequently used. Both inform the NMS. Traps use less overhead on the agent, while Informs improve reliability of the messages but require a little more overhead effort.
The Management Information Base(MIB)
Every SNMP agent has its own Management Information Base. The MIB defines variables whose values are set and updated by the agent. The MIB variables on the devices in the network enable the management software to monitor/control the network device. More formally, the MIB defines each variable as an object ID (OID). On most devices, the MIB then organizes the OIDs based in part on RFC standards, and in part with vendor proprietary variables. The MIB organizes all the variables into a hierarchy of OIDs, usually shown as a tree. Each node in the tree can be described based on the tree structure sequence, either by name or by number.

Working directly with an MIB, with long variable names and numbers, can be a bit of a challenge, so NMS software typically hides the complexity of the MIB variable numbering and names. However, to get a sense for the variable names,above example shows the tree structure for two variables, with the variable names being the long string of numbers shown at the bottom of the figure. Working with those numbers and the tree structure can be difficult at best. As a result, most people manage their networks using an NMS such as Cisco Prime. For perspective, you could use an SNMP manager and type MIB variable 1.3.6.1.4.1.9.2.1.58.0 and click a button to get that variable, to see the current CPU usage percentage from a Cisco router. However, most users of an NMS would much prefer to ignore those details and have a simple graphical interface to ask for the same information, never having to know that 1.3.6.1.4.9.2.1.58.0 represents the router CPU utilization MIB variable.
Securing SNMP
SNMP supports a few security mechanisms, depending in part on the particular version. This section works through the options. First, one strong method to secure SNMP is to use ACLs to limit SNMP messages to those from known servers only. SNMP agents on Cisco routers and switches support SNMP messages that flow in both IPv4 and IPv6 packets. The SNMP agent can configure an IPv4 ACL to filter incoming SNMP messages that arrive in IPv4 packets and an IPv6 ACL to filter SNMP messages that arrive in IPv6 packets. Using an IPv4 and IPv6 ACL to secure an agent makes good sense. The only hosts that should be sending SNMP messages to the SNMP agent in a router or switch are the NMS hosts. Those NMS hosts seldom move and their IP addresses should be well known to the networking staff. It makes good sense to configure an ACL that permits packets sourced from the IP addresses of all NMS hosts, but no others.
As for the SNMP protocol messages, all versions of SNMP support a basic clear-text password mechanism, although none of those versions refer to the mechanism as using a password. SNMP Version 3 (SNMPv3) adds more modern security as well. SNMPv1 defined clear-text passwords called SNMP communities . Basically, both the SNMP agent and the SNMP manager need prior knowledge of the same SNMP community value (called a community string). The SNMP Get messages and the Set message include the appropriate community string value, in clear text. If the NMS sends a Get or Set with the correct community string, as configured on the SNMP agent, the agent processes the message.
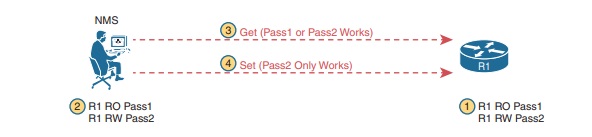
SNMPv1 defines both a read-only community and a read-write community. The read-only (RO) community allows Get messages, and the read-write (RW) community allows both reads and writes (Gets and Sets). At steps 1 and 2, the agent is configured with particular RO and RW community strings, and the NMS configures the matching values. At step 3, the SNMP Get can flow with either community, but at Step 4, the Set Request must use the RW community.
SNMPv2, and the related Community-based SNMP Version 2 (SNMPv2c), added a wrinkle in naming but basically kept the same community security feature as SNMPv1 once the standards process completed. The original specifications for SNMPv2 did not include SNMPv1 communities; however, the marketplace still wanted communities, so an additional RFC added the SNMPv1 communities mechanism back to SNMPv2. This updated RFC, “Community-based SNMPv2,” came to be known simply as SNMPv2c. Vendors (including Cisco) implemented SNMPv2c; however, security was still relatively weak.
SNMPv3 arrived with much celebration among network administrators. Finally, security had arrived with the powerful network management protocol. SNMPv3 does away with communities and replaces them with the following features:
- Message integrity: This mechanism, applied to all SNMPv3 messages, confirms whether or not each message has been changed during transit.
- Authentication: This optional feature adds authentication with both a username and password, with the password never sent as clear text. Instead, it uses a hashing method like many other modern authentication processes.
- Encryption (privacy): This optional feature encrypts the contents of SNMPv3 messages so that attackers who intercept the messages cannot read their contents.
SNMP Configuration Guidelines
If the switch starts and the switch startup configuration has at least one snmp-server global configuration command, the SNMP agent is enabled. An SNMP group is a table that maps SNMP users to SNMP views. An SNMP user is a member of an SNMP group. An SNMP host is the recipient of an SNMP trap operation. An SNMP engine ID is a name for the local or remote SNMP engine.
When configuring SNMP, follow these guidelines:
- When configuring an SNMP group, do not specify a notify view. The
snmp-server hostglobal configuration command autogenerates a notify view for the user and then adds it to the group associated with that user. Modifying the group’s notify view affects all users associated with that group. See the Cisco IOS Network Management Command Reference for information about when you should configure notify views. - To configure a remote user, specify the IP address or port number for the remote SNMP agent of the device where the user resides.
- Before you configure remote users for a particular agent, configure the SNMP engine ID, using the
snmp-server engineIDglobal configuration with the remote option. The remote agent’s SNMP engine ID and user password are used to compute the authentication and privacy digests. If you do not configure the remote engine ID first, the configuration command fails. - When configuring SNMP informs, you need to configure the SNMP engine ID for the remote agent in the SNMP database before you can send proxy requests or informs to it.
- If a local user is not associated with a remote host, the switch does not send informs for the auth (authNoPriv) and the priv (authPriv) authentication levels.
- Changing the value of the SNMP engine ID has important side effects. A user’s password (entered on the command line) is converted to an MD5 or SHA security digest based on the password and the local engine ID. The command-line password is then destroyed, as required by RFC 2274. Because of this deletion, if the value of the engine ID changes, the security digests of SNMPv3 users become invalid, and you need to reconfigure SNMP users by using the
snmp-server userusername global configuration command. Similar restrictions require the reconfiguration of community strings when the engine ID changes.
Default SNMP Configuration
| Feature | Default Setting |
|---|---|
| SNMP agent | Disabled |
| SNMP trap receiver | None configured |
| SNMP traps | None enabled except the trap for TCP connections (tty). |
| SNMP version | If no version keyword is present, the default is Version 1. |
| SNMPv3 authentication | If no keyword is entered, the default is the noauth (noAuthNoPriv) security level. |
| SNMP notification type | If no type is specified, all notifications are sent. |
The no snmp-server global configuration command disables all running versions (Version 1, Version 2C, and Version 3) on the device. No specific Cisco IOS command exists to enable SNMP. The first snmp-server global configuration command that you enter enables all versions of SNMP.
Configuring Community Strings
You use the SNMP community string to define the relationship between the SNMP manager and the agent. The community string acts like a password to permit access to the agent on the switch. Optionally, you can specify one or more of these characteristics associated with the string:
An access list of IP addresses of the SNMP managers that are permitted to use the community string to gain access to the agent,
A MIB view, which defines the subset of all MIB objects accessible to the given community,
Read and write or read-only permission for the MIB objects accessible to the community
Beginning in privileged EXEC mode, follow these steps to configure a community string on the switch:
| Command | Purpose |
|---|---|
| configure terminal | Enter global configuration mode |
snmp-server community string [ view view-name ] [ ro | rw] [ access-list-number ] | Configure the community string. For string, specify a string that acts like a password and permits access to the SNMP protocol. You can configure one or more community strings of any length. view, ro, rw, accesslist are optional. |
access-list access-list-number { deny | permit } source [ source-wildcard ] | (Optional) If you specified an IP standard access list number in Step 2, then create the list, repeating the command as many times as necessary. |
end | Return to privileged EXEC mode. |
Configuring SNMP Groups and Users
You can specify an identification name (engine ID) for the local or remote SNMP server engine on the switch. You can configure an SNMP server group that maps SNMP users to SNMP views, and you can add new users to the SNMP group.
Beginning in privileged EXEC mode, follow these steps to configure SNMP on the switch:
| Command | Purpose |
|---|---|
configure terminal | Enter global configuration mode |
snmp-server engineID { local engineid-string | remote ip-address [ udp-port port-number ] engineid-string } | Configure a name for either the local or remote copy of SNMP. The engineid-string is a 24-character ID string with the name of the copy of SNMP. You need not specify the entire 24-character engine ID if it has trailing zeros. Specify only the portion of the engine ID up to the point where only zeros remain in the value. For example, to configure an engine ID of 123400000000000000000000, you can enter this: snmp-server engineID local 1234 If you select remote, specify the ip-address of the device that contains the remote copy of SNMP and the optional User Datagram Protocol (UDP) port on the remote device. The default is 162. |
snmp-server group groupname { v1 | v2c | v3 { auth | noauth | priv } } [ read readview ] [ write writeview ] [ notify notifyview ] [ access access-list ] | Configure a new SNMP group on the remote device. For groupname, specify the name of the group. Specify a security model: – v1 is the least secure of the possible security models.– v2c is the second least secure model. It allows transmission of informs and integers twice the normal width. – v3, the most secure, requires you to select an authentication level: auth —Enables the Message Digest 5 (MD5) and the Secure Hash Algorithm (SHA) packet authentication.noauth —Enables the noAuthNoPriv security level. This is the default if no keyword is specified. priv —Enables Data Encryption Standard (DES) packet encryption (also called privacy). |
snmp-server user username groupname { remote host [ udp-port port ]} { v1 [ access access-list ] | v2c [ access access-list ] | v3 [ encrypted ] [ access access-list ] [ auth { md5 | sha } auth-password ]} [ priv { des | 3des | aes { 128 | 192 | 256 }} priv-password ] | Add a new user for an SNMP group. The username is the name of the user on the host that connects to the agent. The groupname is the name of the group to which the user is associated. Enter remote to specify a remote SNMP entity to which the user belongs and the hostname or IP address of that entity with the optional UDP port number. The default is 162. Enter the SNMP version number (v1, v2c, or v3). If you enter v3, you have these additional options: – encrypted specifies that the password appears in encrypted format. This keyword is available only when the v3 keyword is specified. – auth is an authentication level setting session that can be either the HMAC-MD5-96 (md5) or the HMAC-SHA-96 (sha) authentication level and requires a password string auth-password (not to exceed 64 characters). If you enter v3 and the switch is running the cryptographic software image, you can also configure a private (priv) encryption algorithm and password string priv-password (not to exceed 64 characters). – priv specifies the User-based Security Model (USM). – des specifies the use of the 56-bit DES algorithm. – 3des specifies the use of the 168-bit DES algorithm. – aes specifies the use of the DES algorithm. You must select either 128-bit, 192-bit, or 256-bit encryption. |
end | Return to privileged EXEC mode. |


