Malware can arrive via connected USB devices on your PC. Today we some how to shut off USB ports to prevent that possible method of attack. If you use your laptop or computer in shared spaces such as cafes, libraries, or even offices, you should disable the computer’s USB ports. Additionally, you should not plug any found or unknown USB in your computer, it may contain malware. This will keep your system safe from malware and stop your data from being stolen.
Before you choose and try one of the listed methods, make sure you’ve logged into an administrator account. Otherwise, you’ll not be able to make the required system changes.
- Disable USB Ports With Device Manager
- Disable USB Ports With the Registry Editor
- Disable USB Ports with Group Policy Editor
- Disable USB Ports With the Command Prompt
Disable USB Ports With Device Manager
If you’re looking for an easy solution to disable the USB ports to prevent malware infection, try doing it with Device Manager.
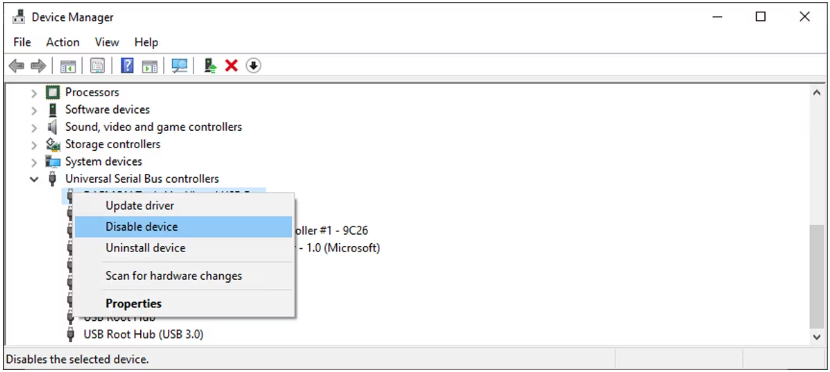
- Open Device Manager.
- Expand the Universal Serial Bus Controllers list.
- Right-click the USB port and select Disable device.
If you’re sure a USB doesn’t have any viruses or malware, go through the above steps and select Enable to connect it without any problems.

Disable USB Ports With the Registry Editor
If you’re accustomed to editing the Windows Registry, you can easily use it to disable your computer’s USB ports.
- In the Start menu search bar, search for registry editor and select the Best match.
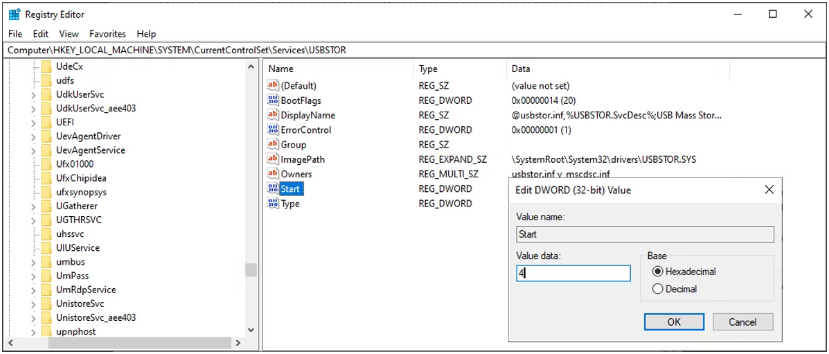
- In the left pane, navigate to HKEY_LOCAL_MACHINE > SYSTEM > CurrentControlSet > Services > UBSSTOR.
- Open Start.
- Set Value data to 4 and click OK.
f you want to re-enable USB ports, go through the above steps again and set Value data to 3.

Malware can take advantage of the Windows AutoRun feature, so malicious programs can start running as soon as you connect the USB. To protect your computer, you should disable the Autorun utility for external devices.
In Registry Editor, head to HKEY_CURRENT_USER > Software > Microsoft > Windows > CurrentVersion > Policies > Explorer. There, double-click NoDriveTypeAutoRun, set Value Data to 4, and click OK.
Disable USB Ports with Group Policy Editor
The Group Policy Editor is a Windows built-in tool that allows you to personalize your computer or network settings. In this case, you can use it to disable your computer’s USB ports.
- Use the Win + R keyboard shortcut to bring up a Run dialog.
- Type gpedit.msc and press Enter. Windows will now open the Local Group Policy Editor.
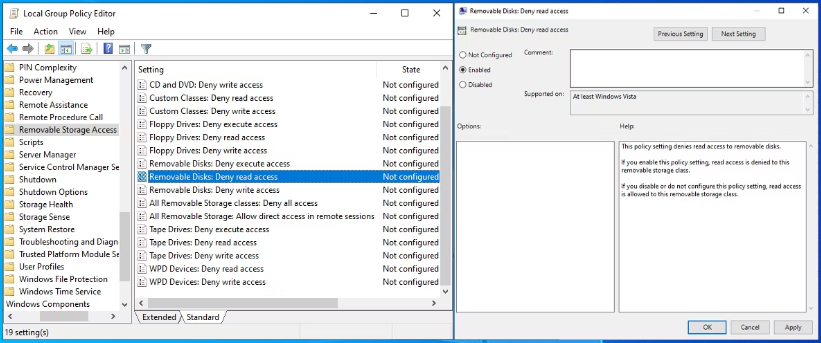
- Using the left-hand menu, navigate to Computer Configuration > Administrative Templates > System > Removable Storage Access.
- In the right part of the window, locate and open Removable Disks: Deny execute access.
- Select Enabled and click Apply > OK.
- Open Removable Disks: Deny read access, select the Enabled option and save the new system settings.
If you need to enable the USB ports again, go through the above steps and select Not Configured for both settings.

Disable USB Ports With the Command Prompt
Using Command Prompt is a fast way to disable or enable the USB ports, especially if you save the command lines in Sticky Notes or other alternatives for quick access.
To disable the USB ports, open Command Prompt with administrative rights. Then, type reg add HKLM\System\CurrentControlSet\Services\cdrom /t REG_DWORD /v "Start" /d 4 /f and press Enter.
If you want to re-enable the USB ports, enter the reg add HKLM\System\CurrentControlSet\Services\cdrom /t REG_DWORD /v "Start" /d 1 /f command line and press Enter to run it.

These tips will help you disable the USB ports and keep your computer safe from malware. If you’re more concerned about your data being stolen, you can password protect your computer, folders, or files.


